Creating Portals
You can create a portal structure in your repository, which you can populate by adding pages. You can also configure the option for users to create personal pages.
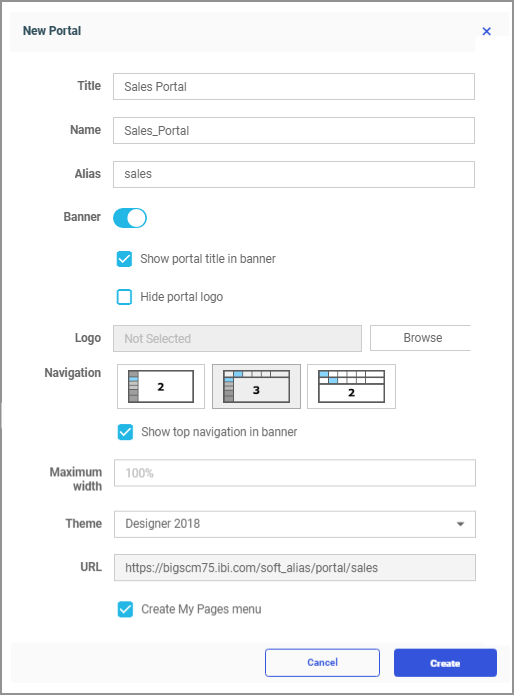
Procedure: How to Create a Portal
- In the Resources tree, select the workspace or folder where you want to create the portal, click the Applications tab in the action bar, and then click Portal.
The New Portal dialog box opens.
- Populate the fields.
The following fields are available:
- Title. The title of the portal.
- Name. The name of the portal. This field is populated automatically to match the Title field. You can edit the field with a custom name if you want.
- Alias. Creates an alias for your portal.
- Banner. Activates the banner for your portal. This option is enabled, by default.
Note: It is recommended to disable the banner if you plan to embed your portal into a third-party application.
- Show portal title in banner. When selected, displays the title of the portal in the banner.
- Hide portal logo. If selected, removes the logo placeholder from the portal banner.
- Logo. Allows you to select a logo image from your repository to customize your portal.
Note: This option is inactive when the Hide portal logo option is enabled.
- Navigation. Provides layout selection for your portal. The options are two-level side, three-level, and two-level top.
- Maximum width. Controls the maximum width of the portal, which includes the banner, all pages, and side navigation. If specified, overrides the Maximum width property set for pages in the portal.
Note: The placeholder text changes to a pixel value when you enter a number.
- Show top navigation in banner. If selected, displays the folder structure as banner links rather than tabs. This option is only available for three-level and two-level top layouts.
- Theme. Allows you to select themes that can be customized.
- URL. A read-only field that displays the URL for the portal.
Note: When you type an Alias value, the URL field automatically changes to reflect the new location.
- Create My Pages menu. If selected, enables users to create personal pages at run time.
Note: This option is not available in the Edit Portal dialog box.
An example of the New Portal dialog box that has been populated with information s shown in the following image.
- Click Create.
The new portal structure is created in the specified workspace or folder. It is now ready to be populated with folders, pages, and shortcuts that serve as links to other pages.
- To edit your portal, right-click it, and then click Edit.
The Edit Portal dialog box opens, where you can change your selections.
- Release: 8207
- Category: Building Portals
- Product: Business Intelligence Portal