Linking to External Content From a Page
The link tile widget provides additional innovative ways of using your content and incorporating it into your page. The link tile widget layers content in such a way that one content item becomes a click-through tile that opens another content item. This feature is especially useful when you need to incorporate a large or Insight-enabled item into a page and display it on all devices. The link tile widget can be used in pages assembled from existing content.
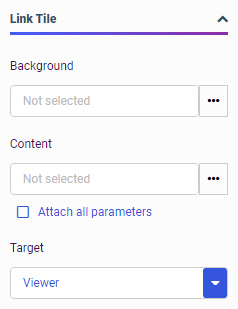
To add a link tile to a page, drag the link tile object from the Resources panel with Container selected on the sidebar. You configure a link tile using the Settings tab of the Properties panel, as shown in the following image.

When adding a link tile widget to a page, you configure the content that you want to display on the page using the Background property, the item that you want to link to using the Content property, and the location in which to open the linked content using the Target property.
If the link tile background content is a procedure, filters can be created for and applied to it just like any other content item. The background behaves as a static image, so interactive features, such as tooltips or hyperlinks, are not enabled.
Note: Images, such as .jpeg, .png, or .gif files, used as the link tile background, are scaled to completely fill the link tile container. If the image is much smaller than the link tile container, it may become pixelated when it is resized to fill the frame. As a best practice, either use an image that is about the same size as the link tile container, or use an image in SVG format, which is designed to display well at any size or resolution.
Additionally, the filter selections in the page can be passed to the link tile target content if it is a procedure or a page by enabling the Attach all parameters option. When enabled, the link tile target is automatically filtered corresponding to the source page.
Procedure: How to Use the Link Tile Widget
- Assemble a new page from existing content, or open an existing page in WebFOCUS Designer.
- On the sidebar, click the Container tab.
- Drag a link tile container from the Resources panel onto the page.
The link tile container initially appears blank.
- With the link tile selected on the page, expand the Link Tile area of the Settings tab on the Properties panel.
Note: The link tile container does not include a title bar by default, so clicking the link tile on the canvas may only allow you to select the link tile background content. To select the link tile container more easily, use the outline.
- In the Link Tile section of the Settings tab, click the ellipsis button next to the Background option and navigate to the item from your repository that you would like to display in the link tile.
You can select a FOCEXEC procedure such as a chart or report, a page, an image, a URL, an HTML page, and more. The item behaves as an image, so interactive features such as tooltips are not enabled.
- Click the ellipsis button next to the Content option and select the target item. This content will run when users click on the link tile panel.
- Select the Attach all parameters check box if parameter filter selections from the page should be passed to the target content, or leave it clear to open the target content without passing filter selections.
- Determine how the target item will display. Select Viewer to run the target content item in an overlay on the same browser tab as the link tile, or select New window to run the item in a new browser tab.
- Run the visualization using the Run in new window button to test the link tile behavior.
When you click the link tile, your target content opens as configured.
- Release: 8207
- Category: Adding Content to Pages
- Product: WebFOCUS Designer
- Tags: How-to's
