Localizing Designer Pages
You can translate pages created in WebFOCUS Designer to reflect a specific language preference. This localization includes text strings shown in the page heading, container titles and control labels.
When working with Western European languages you may leave the WebFOCUS client code page and your application server JVM file encoding set to their default values of 1252/ Cp1252. If you plan to support double-byte languages, such as Japanese or Chinese, you must use Unicode/UTF-8 for the WebFOCUS code page and UTF8 for the JVM file encoding.
Note: Contact customer support for assistance with translating Designer pages if any of the following apply to you:
- You are changing the WebFOCUS code page or JVM file encoding settings in an environment that is already being used in production. This may result in certain repository data being misread by WebFOCUS.
- You need to allow non-Administrators to import page translation property files. This can be accomplished with custom security rules.
- You are downloading translation property files for a page that has special characters in its IBFS path, such as in its name or in the names of any of its parent folders. WebFOCUS creates the download zip file correctly and Winzip expands the zip correctly, but Winzip does not properly zip the edited files back up correctly because of the special characters in the folder path. As a workaround, you can use a zip program that supports UTF8 folder name encoding or you can move the unzipped translation folder structure to the WebFOCUS82\cm\import folder.
Procedure: How to Translate a Designer Page
- In the Administration Console, enable the Dynamic Language Switch and choose the languages you plan to support.
Note: This step must be performed by a WebFOCUS Administrator.
- Create a new WebFOCUS Designer page, or locate the existing WebFOCUS Designer page that you want to customize.
- On the Home Page, right-click your Designer page, and then click Download translations.
The archive file, which includes translation property files for each of the languages configured on your WebFOCUS environment, downloads to your machine.
- Unzip the archive file in your preferred directory.
- Expand the root_content, WFC, Repository, and other folders until you reach the folder that matches the name of your page.
The properties files for each language that you enabled in the Dynamic Language Switch setting are available in the folder for your page.
- Open the language property file that you want to modify in a text editing tool that supports editing of UTF-8 encoded files, such as Notepad++.
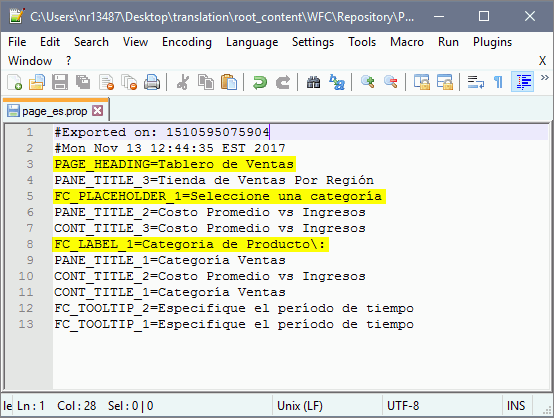
- Supply a translation for all your custom elements.
An example of the translated terms is highlighted in the following image. HTML code for uploaded images:
Note: WebFOCUS will escape certain special characters with a backslash (\), including the colon (:), the equal sign (=), and the backslash. Leave these escape characters in place if you encounter them in the property files. -
Save your changes and close the text editing tool.
-
Create a new zip archive for the edited property files.
It is important to preserve the folder structure of the property files as well as the other files originally included in the zip file. Steps 2-9 can be performed by any user who has the WebFOCUS Designer privilege. -
Upload and import the new translation zip archive using WebFOCUS Change Management.
Note: You must select Add New and Update Existing Resources in the Import Package dialog box to ensure that the property files are saved. To learn more about WebFOCUS Change Management, see the WebFOCUS Security and Administration manual.
The strings inside the page are now localized.
Note: This step must be performed by a WebFOCUS Administrator or a user who has been granted appropriate security privileges. -
To localize the page title displayed on the Home Page, right-click your page on the Home Page, and then click Properties.
The Properties panel opens. -
Next to the Language property, click View All.
The Language Properties dialog box opens. -
Populate the Title field for your new language with the localized title.
The following image shows an example of the customized language preferences.
-
Click OK, and then click Save on the Properties panel.
The page title is now localized. -
In the banner menu, click Preferences.
The My Preferences dialog box opens. -
Change Language to the one for which you performed your translation, and click OK.
The Home Page reloads using the new language. -
Right-click your page, and then click Run, or the equivalent of this option in your new
language.
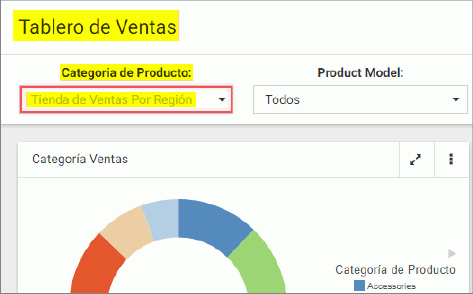
The page runs and displays your localized custom elements, as shown in the following
image.
- Release: 8205
- Category: Creating Content
- Product: WebFOCUS Application and Enterprise Editions
