Setting a Time Zone in Date-Time Controls
Fields that include both the date and a timestamp, as opposed to just the date, are considered to have a date-time format. Date-time fields are considered a separate field type from regular date fields. The timestamp in a date-time value can be precise to the millisecond, microsecond, or nanosecond.
When you filter a date-time field in a chart, report, or authored page in WebFOCUS Designer, you are presented with the ability to change the time zone in addition to the regular date filtering options, allowing you to filter content based on your local time zone. When you set a time zone as part of a date-time filter, content is filtered to show data, which may have recorded in a different time zone, based on whether it would fall within the defined date range in your current time zone. For example, if the data was recorded in Greenwich Mean Time, which is UTC±0 during standard time, and you set the time zone for your date range to a location that uses Eastern Standard Time, which is UTC-5, then the filtered data begins at 5:00 AM on the first day of the range. This is because 5:00 AM in UTC±0, which is used as the time zone where your data originated, is the same time as midnight in Eastern Standard Time, the time zone that you selected for the filter. The start time for the filtered date range is shifted based on the difference between the two time zones. The data values displayed in your content do not change when you change the time zone used in your filter, and are assumed to have been written from a time zone with an offset of UTC±0.
To apply a time zone to a your filter, drag a date-time field into the Filter toolbar or Filters bucket. In addition to the range options that are also available for date fields, a Time Zone option appears, with the default time zone selected, if one has been set on the Reporting Server. To set the time zone for a prompted filter, click the Time Zone menu, as shown in the following image.
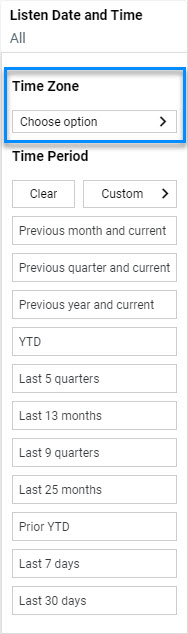
To set the time zone for a static filter, click the Time Zone option, as shown in the following image.

Click the Time Zone menu or Time Zone option to open the Time Zone dialog box, shown in the following image.
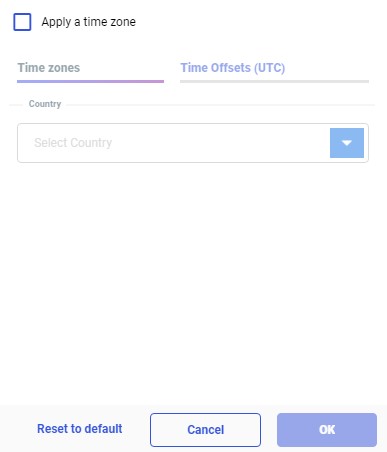
If no default time zone has been set, select the Apply a time zone check box to enable time zone selection. You can select time zones for locations sorted by country or territory, on the Time zones tab, or based on the UTC offset, on the Time Offsets (UTC) tab.
To select a time zone based on a location, on the Time zones tab of the Time Zone dialog box, first select a country or territory from the Country drop-down list. You can start typing the name of a country or territory to navigate to it more quickly. Once you select a country or territory, a list of available location-based time zones in that country appears, as shown in the following image.

Select a location and then click OK to apply it.
Time zones based on locations automatically apply daylight savings, depending on the time of year. For example, the North American Eastern Time zone has a UTC offset of UTC-5 during standard time, and a UTC offset of UTC-4 during daylight time.
When applying a time zone to a date range filter for a date-time field, your data is interpreted as having been written from a time zone with an offset of UTC±0. This is the offset during standard time for the Western European Time time zone, during daylight savings time for the Azores and part of Greenland, and year-round for Iceland and most of West Africa. Therefore, if your data comes from a different original time zone, it is recommended to use a UTC offset equivalent to the time difference between the time zone where the data originated and your current time zone. For example, if your data originated in Los Angeles, and you are currently located in New York, then you can select an offset of UTC+3 to see content with date-time data from Los Angeles, filtered based on a start time of midnight in the New York since the time zone for New York is three hours ahead of the time zone for Los Angeles.
To select a UTC offset instead of a location-based time zone, click the Time Offsets (UTC) tab and select an option. Click OK to apply the new time zone.
Once you set your time zone, select a date range for your filter and apply it. Your content refreshes, and the hour at which your date range starts and ends is adjusted based on the selected time zone.
If you create a page with multiple date-time parameter filters, the same time zone is applied to all of them. When you select a time zone for one filter, an alert appears to inform you that it will also be applied to other date-time filter controls on the page.
If you set a time zone and then want to revert to the default, open the Time Zone dialog box and click Reset to default. If you decide you do not want to apply time zone adjustments at all, open the Time Zone dialog box, clear the Apply a time zone check box, and then click OK.
You can set the default time zone in the locale settings of your reporting server. On the WebFOCUS start page, click Management Center and select Server Workspaces. Alternatively, in the WebFOCUS Reporting Server browser interface, click the Tools menu and click Workspace. Click the Settings menu, point to LOCALE, and then click LOCALE (Language, Numbers, Currency, Dates). Type the default time zone name into the TIMEZONE field. The time zone should use the IANA tz database name, which typically use a format similar to Region/City_Name. For more information, see the List of tz database time zones on Wikipedia.
- Release: 8207
- Category: Visualizing Data
- Product: WebFOCUS Designer
- Tags: Enhancements, Release Features