Understanding Search Options
You have access to advanced search options when searching folders, which allows you to identify your content quickly and easily.
On the WebFOCUS Home Page, when you select a folder in the tree, the name of this folder is automatically populated in the Search text box. If you select a different sidebar, the name of the sidebar displays in the Search text box. When you enter a value in this text box, the search is conducted in that folder, or for that sidebar only.
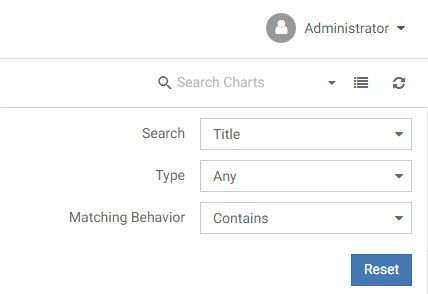
Search Options allow you to be more specific in your search. You can specify search criteria, such as Title or Type. This gives you more control over your search, giving you greater precision in your search results. For example, using these Search Options would allow you to find all procedures that contain information by region in one search, without having the need to go through various folders.
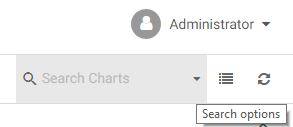
The Search options are available by clicking the highlighted drop-down arrow next to the search text box, as shown in the following image.
![]()
The Search options tooltip displays when you hover over the drop-down arrow, as shown in the following image.
Procedure: How to Use the Search Options to Perform a Search
- Enter text inside the Search text box, as shown in the following image.

Note: When you type within the search field, an X icon displays next to the Search options drop-down arrow. Click the X to clear the Search text box.
- Click the Search options drop-down arrow.
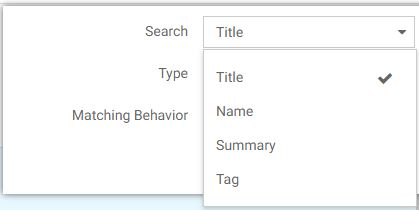
- Select search criteria from the Search options menu, as shown in the following image.
- Once you have specified search criteria, click outside the Search options area to perform the search.
Note: If the Search text box is empty, the search will not be performed.
- Click the Reset button to reset all search option setting defaults and clear any text entered in the Search text box.
Defaults are also reset when you sign out and sign back in. Search option settings are stored per session.
Using the Search Setting
Search setting options allow you to find content by searching for your term in various fields. These setting options are single-select and include: Title, Name, Summary, and Tag. The default option is Title, as shown in the following image.
Using the Type Setting
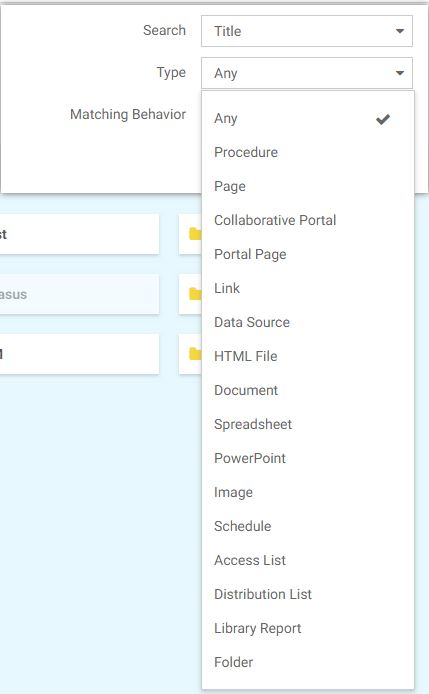
Type setting options allow you to specify the type of content you want to find. These settings options are multi-select and vary depending on the sidebar view.
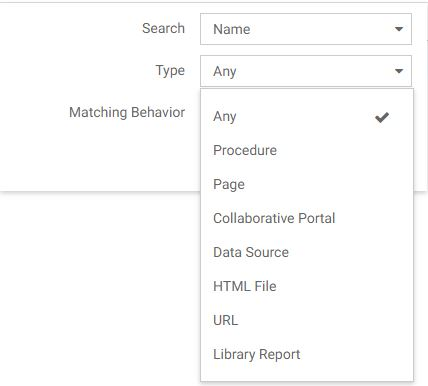
Setting the Content View
Type setting options for the Content View sidebar include the following: Any, Procedure, Page, Collaborative Portal, Portal Page, Link, Data Source (Reporting Object, Master File), HTML File, URL, Document (PDF, Word Doc), Spreadsheet (Excel), PowerPoint, Image, Schedule, Access List, Distribution List, Library Report, and Folder. Setting this option to Page will only return content items that were created as a Page.
The default option is Any, as shown in the following image.
Setting the Portals View
Type setting options for the Portals View sidebar include: Any, Collaborative Portal, and Basic Portal.
The default option is Any, as shown in the following image.
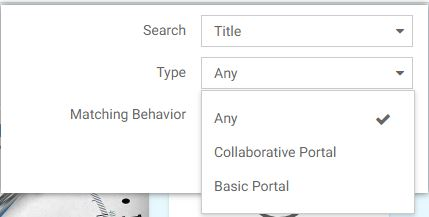
Note: Basic portals are searched by Title and Name only. If the title and name options are cleared in the Search settings list, Basic portals will not be returned in the search.
Setting the Favorites View
Type setting options for the Favorites View sidebar include the following: Any, Procedure, Page, Collaborative Portal, Data Source (Reporting Object, Master File), HTML File, URL, and Library Report.
The default option is Any, as shown in the following image.
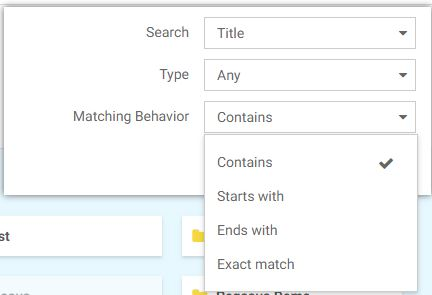
Using the Matching Behavior Setting
Matching Behavior setting options allow you to specify how to use your search term to find content. These setting options are single-select, and include the following: Contains, Starts with, Ends with, and Exact match. For example, if you set this option to Exact match, only content that exactly matches the search term will be found.
The default option is Contains, as shown in the following image.
- Release: 8206
- Category: Searching Content
- Product: InfoSearch
- Tags: How-to's