Using the InfoSearch Index Builder
In order to access the Ask WebFOCUS user interface and perform InfoSearch searches, there must be at least one dimensional index present in the WebFOCUS software that corresponds to at least one domain. This is done by creating a dimensional data procedure in each domain that defines the dimensions that will be used to search your repository content.
Dimensional data procedures must contain the following components:
- Dimension names drawn from a Master File.
- Corresponding data values that those dimensions may have.
- An internal field name, if there are display values and internal values.
Note: You can only add non-numeric fields to a dimensional data procedure.
To create a dimensional data procedure, you must select the domain in which you are defining data for the dimensional data procedure, a Master File that provides dimension values, and the fields that you want to include. When you build the dimensional data procedure, you must select a Field Name and Title for each value that you define. Note that if there is already a value for Title in your Master File, the Title box automatically populates with that information.
While you are building the components of your index, you may come across the following issues that should be taken into consideration:
- Synonyms in your data that may not easily be recognized by voice or text, such as "1st" versus "First".
- Multiple data values with the same stem or root word, such as "television" and "televisions".
With your WebFOCUS installation you have access to WebFOCUS Magnify search technology, an Information Builders enterprise business intelligence search tool that you can use to create and find business content across an organization. Whether or not you have a WebFOCUS Magnify license, you can use components of this technology to enhance the InfoSearch experience for your users.
- For more information on using Magnify technology to configure how synonyms are recognized, see the Configuring Synonyms topic in the Magnify Search Security and Administration technical content.
- For more information on using Magnify technology to configure multiple data values with the same stem word, see the Magnify Analyzers topic in the Magnify Search Security and Administration technical content.
While creating an index in the InfoSearch Index Builder, you may want to add a qualifying name to an index entry so InfoSearch can discern between two or more similar data values. To use the Qualifying Name feature, the data you select must have multiple matching values that can be filtered by another value.
For example, if you are indexing data that contains information about two cities with the same name, such as Kansas City, you can use the Qualifying Name field to add the ability to select data for Kansas City, Kansas and Kansas City, Missouri.
Alternatively, when you retrieve a data value as a search result, you may also want to display the code name assigned to your data. For example, if your search term is Newark Liberty International Airport, and the designated code name for this value is EWR, you can configure your index to display the EWR value next to Newark Liberty International Airport when you open a search result.
To expand search and index capabilities beyond a single domain, you must copy the same dimensional data procedure to each domain that shares the data that you want to index. Optionally, you can create new dimensional data procedures for each additional domain, meaning each domain will have a separate dimensional index.
If needed, you can delete indexes. This can be done from your file system or by accessing the Magnify Console, a component of Magnify Search. Contact your administrator to confirm the best approach.
Note: Turn off the application server before deleting index files.
Example: Using Qualifying Names to Differentiate City-State Index Entries
In this example, a dimension data procedure is created with the goal of indexing reports that contain data about two cities named Portland. Using the Qualifying Name field in the Index Builder allows the ability to search for data specifically for Portland, Oregon, and Portland, Maine.
The following image shows the InfoSearch Index Builder with values already assigned.
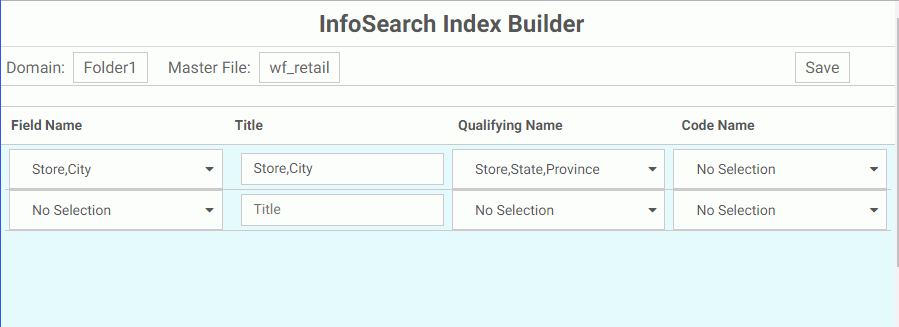
The Domain that uses this index is Folder 1. The Master File assigned to this domain is wf_retail. The first dimensional data procedure entry is Store,City, which contains data about cities named Portland. The Qualifying Name value for the same entry is the Store,State,Province data. Designating this data as a qualifying value will allow users to differentiate Store,City data by State and Province.
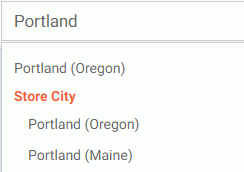
After the dimension data procedure is saved and run, the search index for the Folder1 domain updates. When you type Portland in the InfoSearch search bar, if reports that contain parameters for Portland, Oregon and Portland, Maine have been saved in the Folder1 domain, the option to search for reports which contain the values Portland (Oregon) or Portland (Maine) is made available, as shown in the following image.
Example: Viewing Code Names in Your Search Results
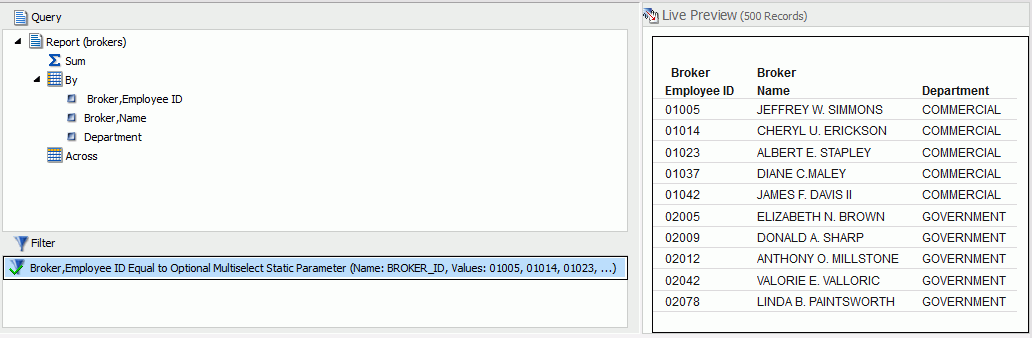
The following image shows a report created in InfoAssist that displays a list of employees, their employee IDs, and the department of each employee. Parameter options for the Broker Employee ID data have been added to the report, as displayed in the Filter dialog box.
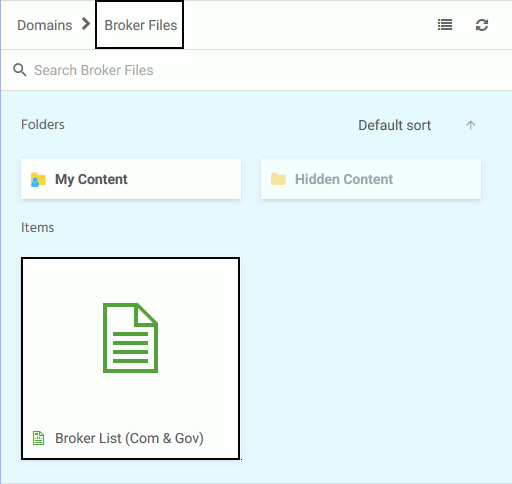
This report is then saved in the Repository so it can eventually be found by InfoSearch. The following image shows the saved report and the domain of the saved report.
The following image shows the InfoSearch Index Builder. To create an index procedure that will display Employee IDs for all employees, the Code Name field for the Broker,Name data has the option Broker, Employee ID (A5) assigned to it.
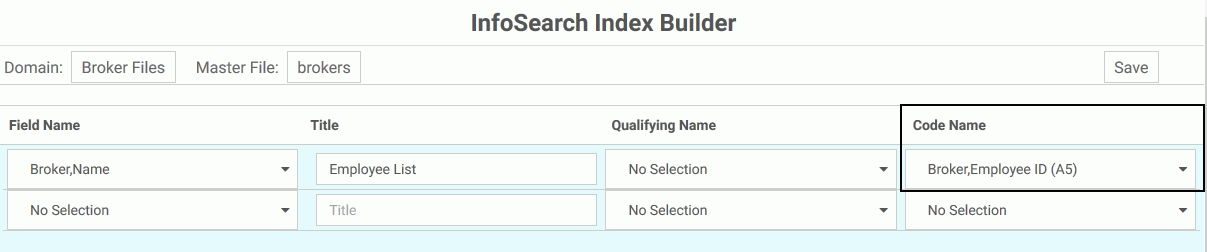
Selecting this option means that all employee search results will have their corresponding employee ID displayed next to their name. Changing the name of the Title of the data, which is how the data collection will be titled in search results, is optional.
When this dimensional data procedure is saved and run, The Employee List report will be indexed, meaning it will now be searchable by InfoSearch.
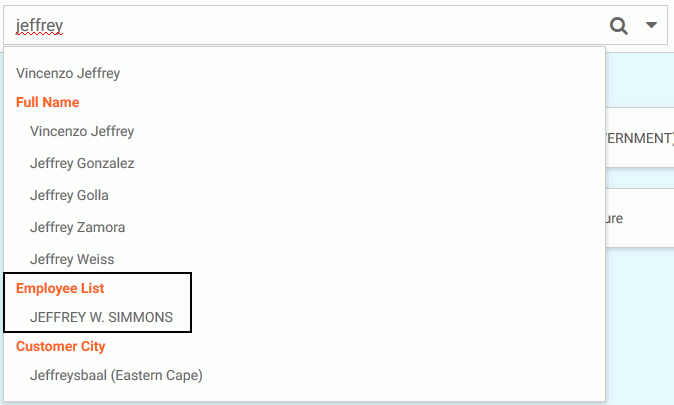
The following image displays a search request for employee Jeffrey W. Simmons.
Clicking the search result, and then clicking the magnifying glass on the search bar, displays a single search result, the report that contains information about Jeffrey W. Simmons. Clicking this tile displays the name and user ID of the employee, as shown in the following image.
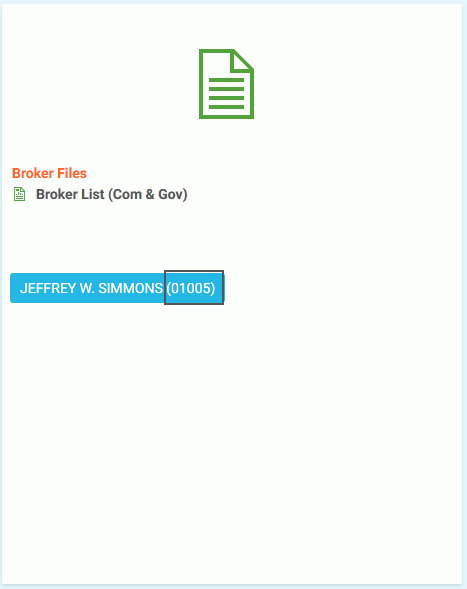
Since the Code Name field in the dimensional data procedure was set so that Employee ID numbers would be displayed, Employee ID numbers now appear next to the name of every employee when a search is initiated.
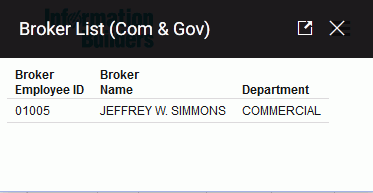
Clicking the blue box displays the full report for the employee, shown in the following image.
Procedure: How to Create a Dimensional Data Procedure Using the InfoSearch Index Builder
- In your browser, navigate to the InfoSearch Index Builder page, using the following link:
https://host:port/ibi_apps/ibxtools/explore/dimidxbuilder.jsp
where:
- host
-
Is the name or IP address of the host used to access WebFOCUS.
- port
-
Is the number of the port on which the Web Server or Application Server listens.
This value is optional, and it should be excluded if the URL uses the default port for the protocol it uses in the scheme, which is port 80 for URLs using the http protocol or port 443 for URLs using the https protocol.
Note:
- You must be signed in to your WebFOCUS environment in order to access the InfoSearch Index Builder.
- When typing the link to navigate to the InfoSearch Index Builder page, you can use both https:// and http://.
- To use the voice feature, you must be signed in to a secure HTTPS site via Google Chrome.
The InfoSearch Index Builder is shown in the following image.

- In the Domain and Master File lists, select the values that you want to use by clicking Select.
- In the Field Name column, click the drop-down list to display the Master File data values that you can select. Select a data value to add it to your index.
Once you select a value from the drop-down list, an additional row of potential dimensional data values displays. Creating additional values is optional.
- In the Title field, type a title for your dimensional data value. By default, the name of the data you selected for the Field Name is added as the title for this value.
- Optionally, select a Qualifying Name and Code Name for your dimensional data value.
- Optionally, repeat steps 3 to 5 to create additional dimensional data values.
- Once you add your values, click the Save button.
The Save Index dialog box displays.
- Choose a domain that will contain your new dimensional data procedure.
- In the Title and Name fields, type the Title and Name of your procedure file.
- Click the Save button to save your procedure into your selected domain.
If there is a need for using fields not in the data source, once a dimensional data procedure is saved, you may want to use a DEFINE field. To do so, you must edit the procedure manually in the Text Editor and add any of the required DEFINE fields that will be loaded into the search index before it is run. You will need to add the DEFINE field syntax, and then add the call to the DimensionLoad1.fex, while making sure to qualify the DEFINE field with its associated segment.
- Navigate back to the WebFOCUS Home Page.
- Right-click the dimensional data procedure and click Run. Optionally, point to the Run… option and click Run in New Window.
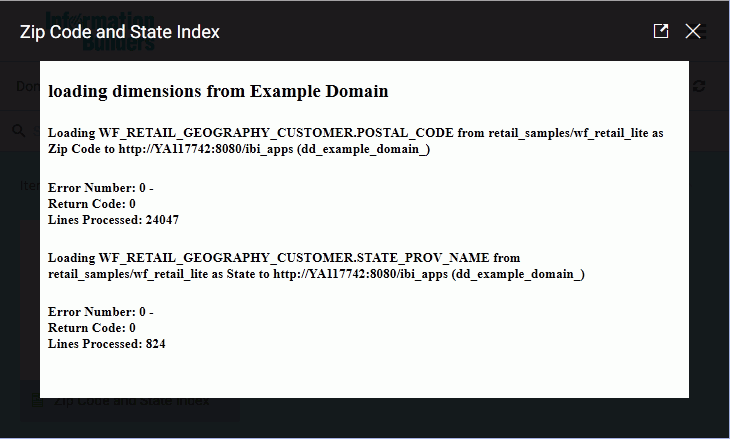
After loading your dimensional data, your index generates. A message appears and a folder containing information about your index is created in drive:\ibi\WebFOCUSnn\magnify\ibi-protected, where nn is release number of your WebFOCUS software.
The following image shows an example of a dimensional data procedure message, which explains that the index was generated successfully, and displays the file system location of the new index.
You can now use Ask WebFOCUS to search for the data values that are referenced in your index.
- Optionally, schedule your dimensional data procedure to update your search index on a regular basis. For more information, see Scheduling Index Updates.
- Optionally, enable future Report Library outputs to be indexed and made searchable by InfoSearch. For more information, see Indexing Report Library Output.
- Release: 8206
- Category: Building Portals, Searching Content
- Product: InfoSearch
- Tags: How-to's