Using Source Control Management with TIBCO WebFOCUS
You can apply source control management to files and folders in your WebFOCUS repository, enabling multiple users to make updates simultaneously without conflicts. When you apply the source control feature to a workspace and connect to a source control repository, such as GitHub, you can store, synch, and safely backup all changes made to your content.
Before you begin using source control management from the WebFOCUS repository, you must enable the option in the Administration Console. For more information, please see the WebFOCUS Security and Administration technical content.
Source Control is a feature that provides many benefits to developers, including the following:
- A valuable feature for companies that need to audit changes made to their applications.
- A repository to store your source code, providing backup in a central location.
- A historical record of changes over time.
- Ability to review and compare changes.
- Ability to retrieve a specific version of a file.
- Ability to compare files between WebFOCUS and a Source Control repository.
Prerequisites for Source Control Management in WebFOCUS
- WebFOCUS must be configured for source control management.
- You must enable an external source control management provider, such as GitHub.
- You must be signed in to WebFOCUS and your external source control management repository.
- Content must be published.
- Source Control Management can only be enabled on the workspace level, it cannot be enabled on the folder level.
- Each workspace must have its own external repository.
- Source Control operations are not available for My Content files or Shared files.
- Schedules, alerts, and blogs cannot be added to source control management.
Procedure: How to add a Workspace to Source Control
- Sign-in to WebFOCUS as a developer or administrator.
- Right-click a workspace that you want to add to Source Control, point to Git / Source Control, and then click Place under Source Management.
The Enable Source Control dialog box opens.
- Fill the login information for your external git source control repository and provide a repository URL.
The following image shows an example of the Enable Source Control dialog box populated with the GitHub repository information.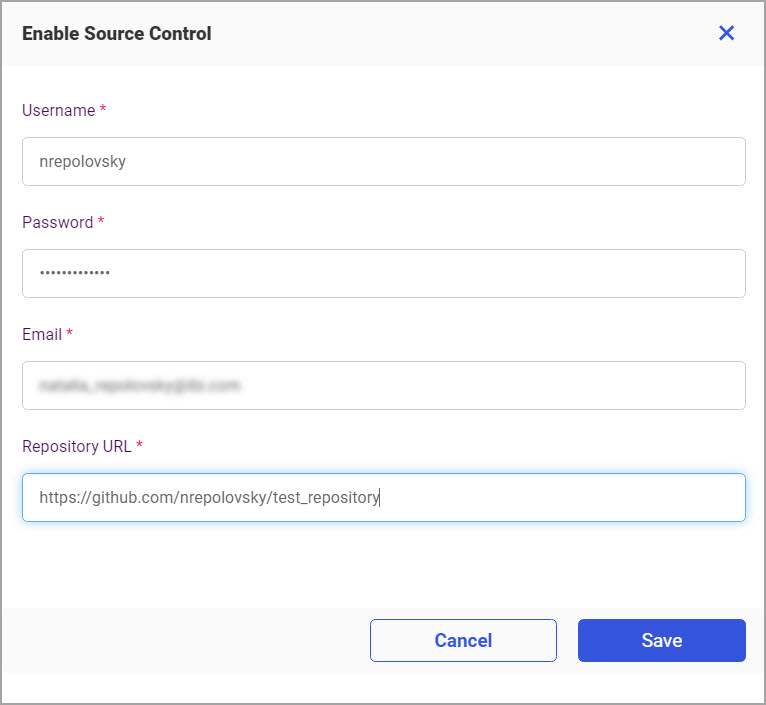
- Click Save.
The workspace title in the Resources tree changes to show the branch that is currently enabled in the remote repository, as shown in the following image.
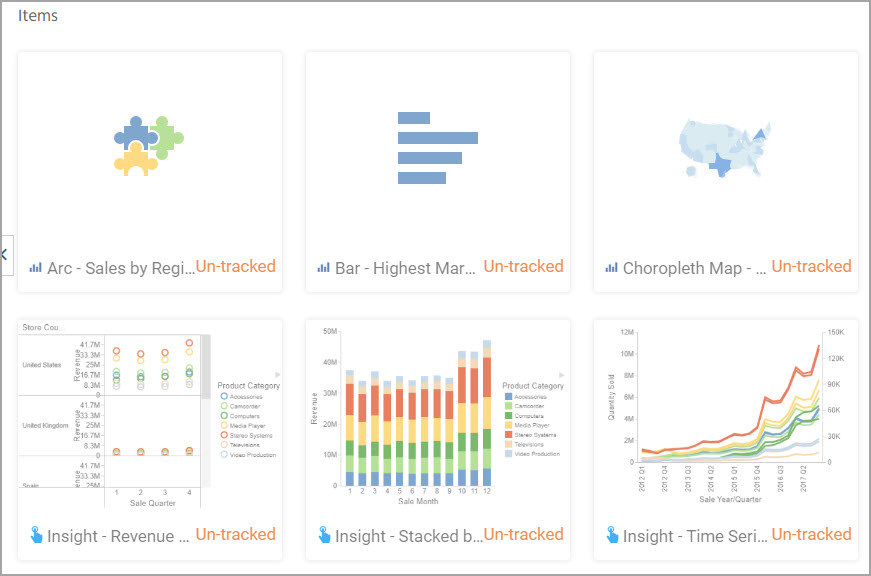
The items in the workspace show the Un-tracked label, as shown in the following image, indicating that the source control management is enabled but the content is not yet synchronized with the remote repository.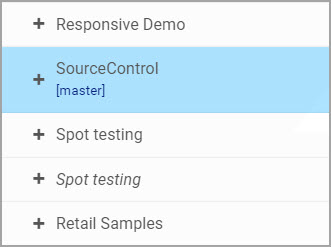
- To remove the workspace from Source Control, right-click it, point to Git / Source Control, and then click Remove From Source Management.
All subsequent changes to this workspace can no longer be committed to the remote repository.
Procedure: How to Create a New Remote Source Control Management Branch
As a best practice, work with a secondary branch before returning all content and changes to the master branch.
- Right-click the workspace that you just put under the Source Management, point to Git / Source Control, and then click Create Remote Branch.
You are redirected to your remote repository.
- Create a secondary branch in your remote repository.
In this example, we are creating a new branch in the GitHub remote repository, which is shown in the following image.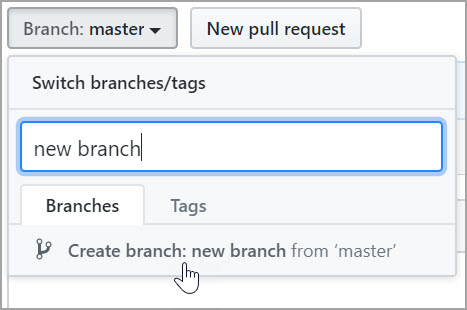
- Switch to the new remote branch that you just created. Right-click the workspace, point to Git / Source Control, and then click Switch to Remote Branch.
The Switch To dialog box opens, as shown in the following image. Here you can see all the branches that are associated with your Source Control repository.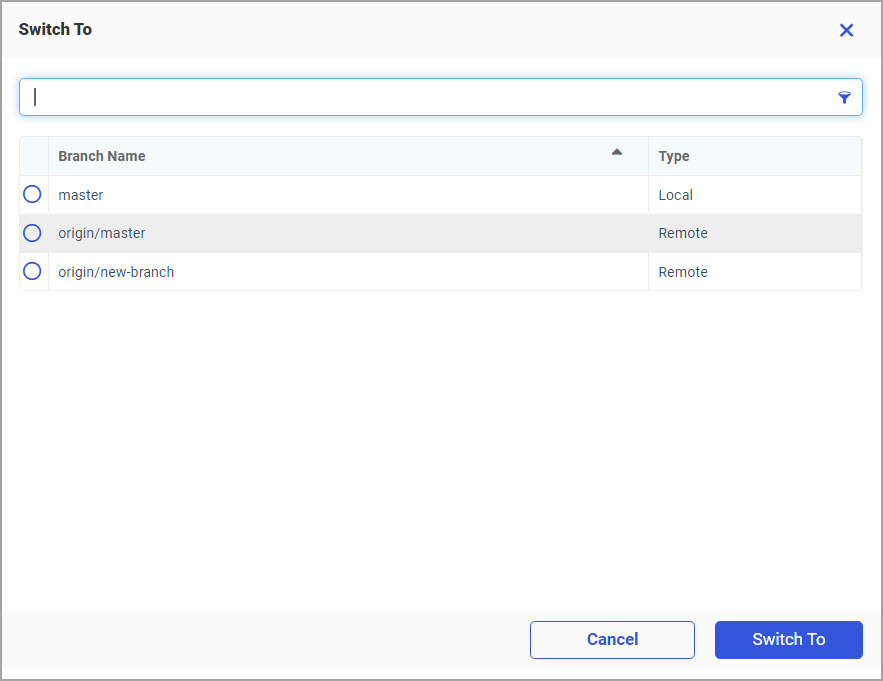
- Select a remote branch from the list and click Switch To.
Note: If your list is long, you can use the search field to look for a specific branch.
The name of your new remote branch is now showing next to the name of the workspace in the Resources tree, as shown in the following image.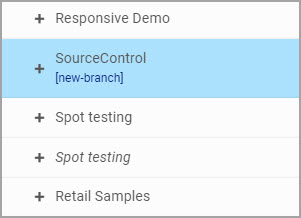
Procedure: How to Create a Commit and Push Request
- Right-click the workspace, point to Git / Source Control, and then click Commit & Push.
The Commit dialog box opens.
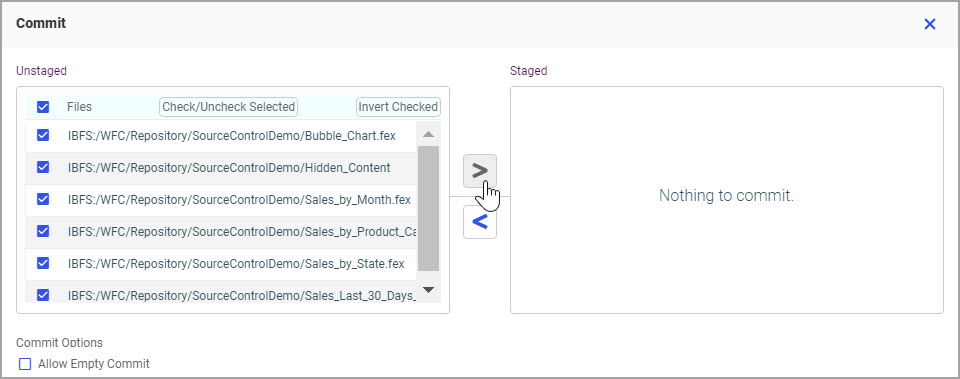
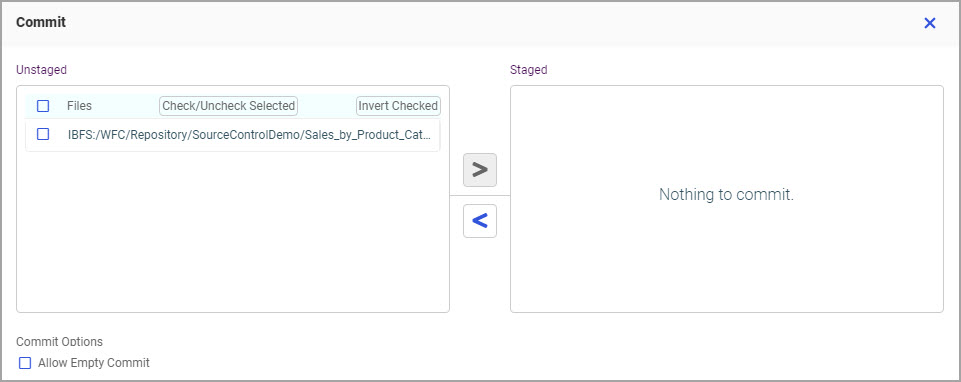
- In the Unstaged pane, select the files that you want to link with your Source Control repository, and use arrows to move them to the Staged pane, as shown in the following image.
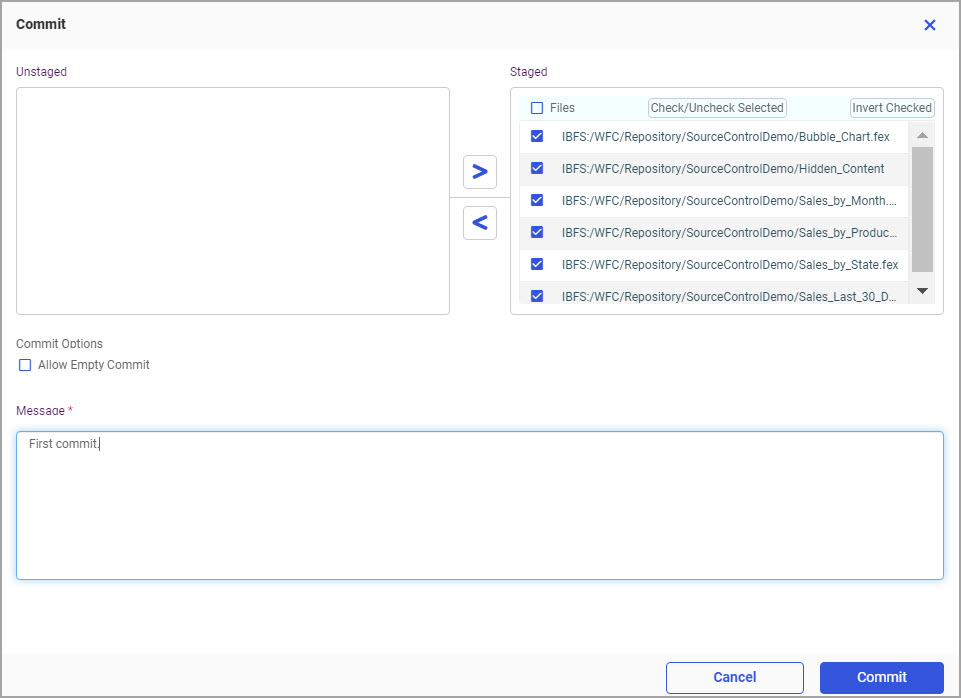
- Fill out the Message field, giving a brief description of this data transfer event, and then click Commit, as shown in the following image.
The items are now synced with your remote repository, as shown in the following image.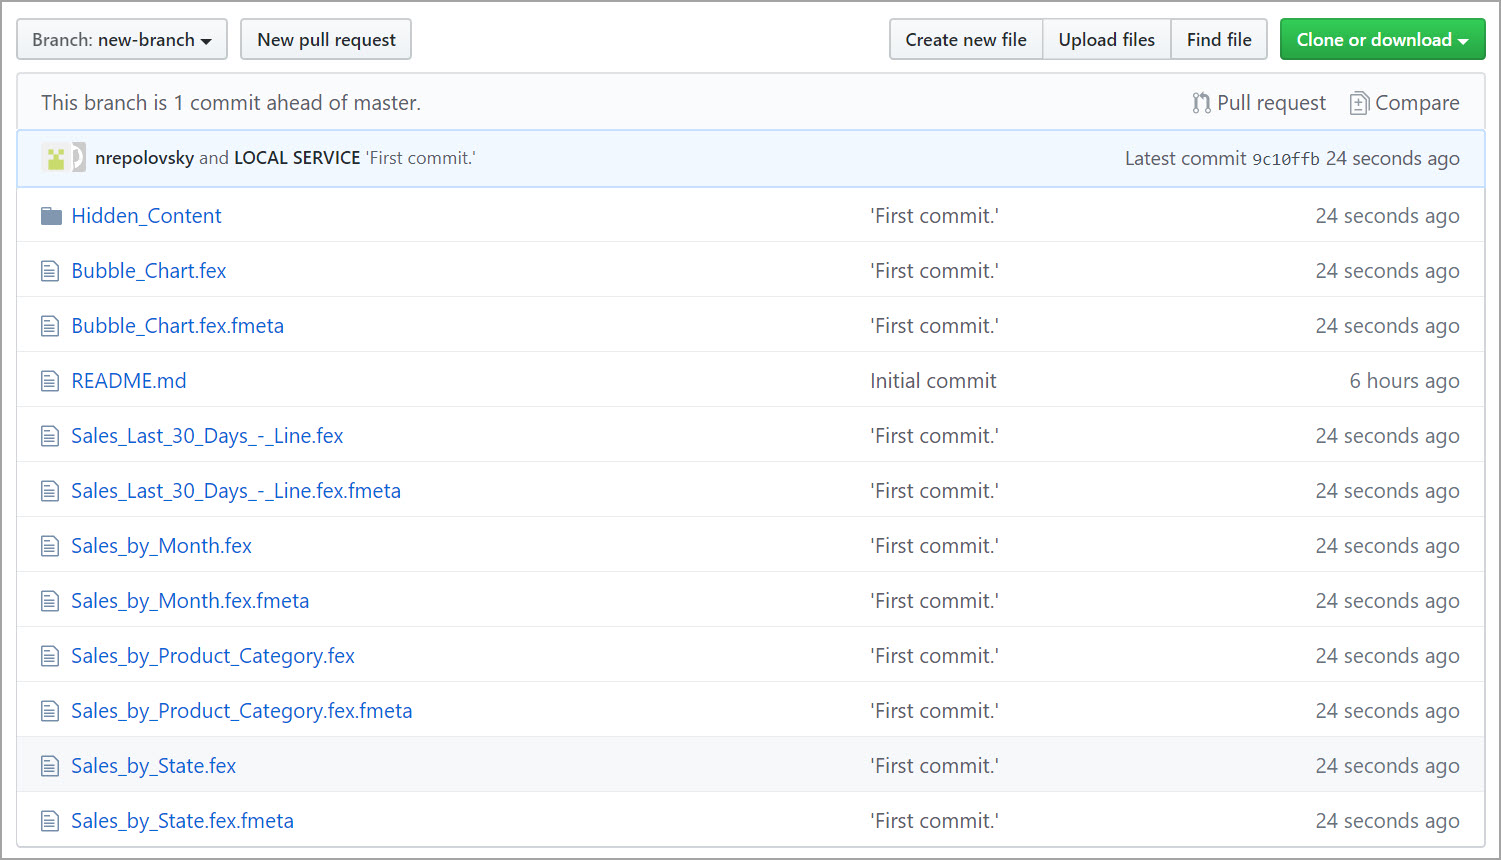
-
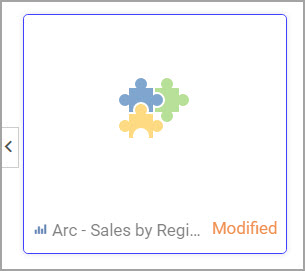
Optionally, make edits to one of the content items, and then repeat steps 1-3.
The item now shows the Modified label, as shown in the following image.
Notice that only the updated item is displayed in the Unstaged pane of the Commit dialog box, as shown in the following image.
Procedure: How to Create a Pull Request
Once all your changes are final, you can bring your content to the master branch.
- Right-click the Workspace, point to Git / Source Control and then click Create Pull Request.
- You are redirected to the remote repository, where you are prompted to create a pull request. The following image shows an example of the pull request in the GitHub remote repository.
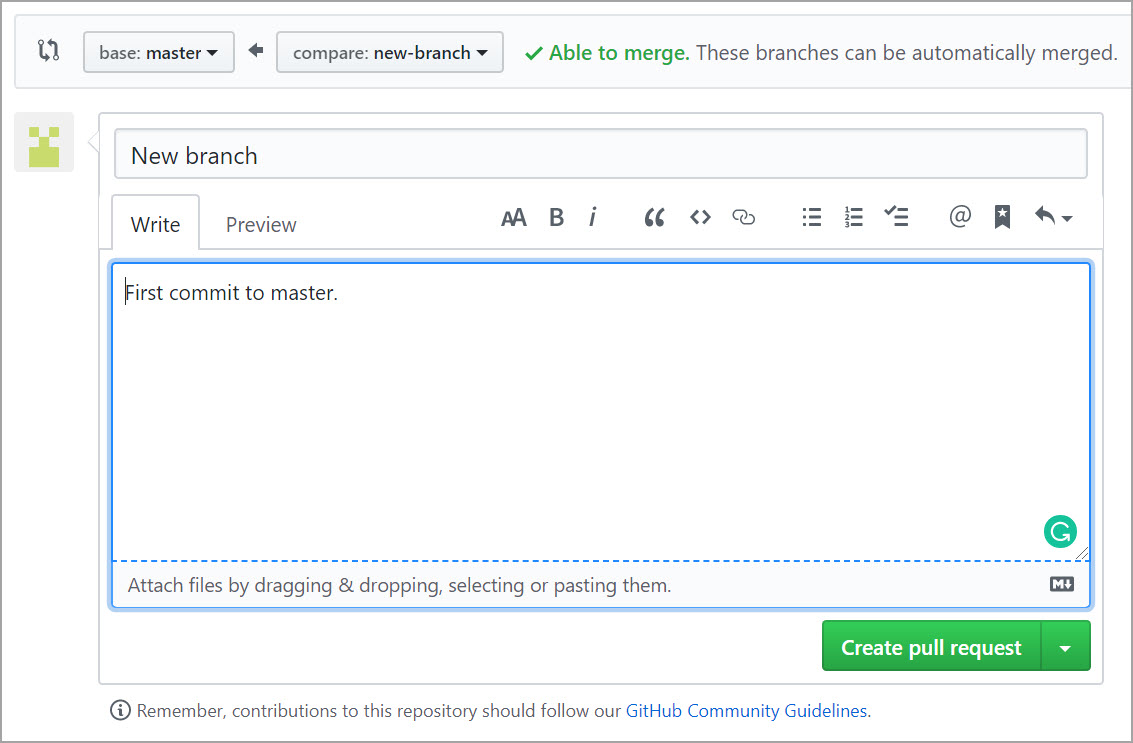
- Create a pull request and merge your changes with the master branch.
A confirmation displays informing you that the merge was successful, as shown in the following image.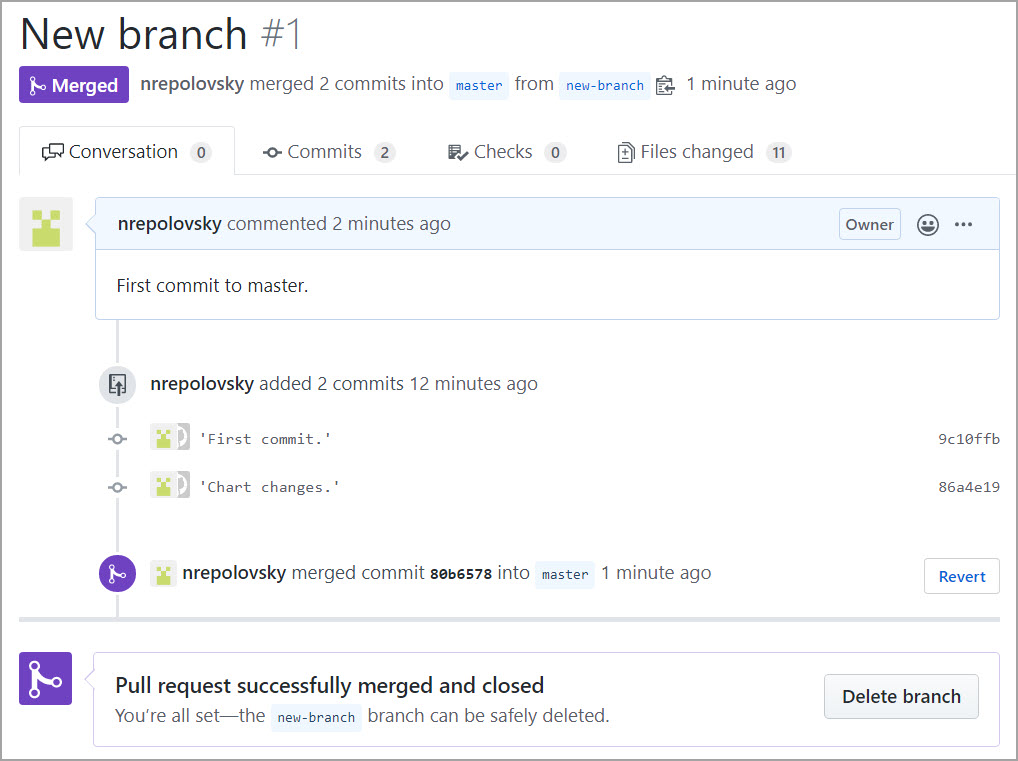
- Optionally, delete the remote branch.
You successfully added your workspace and its content to Source Control.
Note: When several users work on the same files and commit their changes to the same remote repository, use the Commit to WebFOCUS option to sync all committed changes to your environment. If there are uncommitted changes, a warning displays when you click Commit to WebFOCUS.
Procedure: How to View Source Control History
You can view and compare different versions of an item at the moments it was committed to the remote repository.
- Right-click an item in the workspace that was placed under Source Control Management, and then click Source Control History.
The History dialog box opens, as shown in the following image.
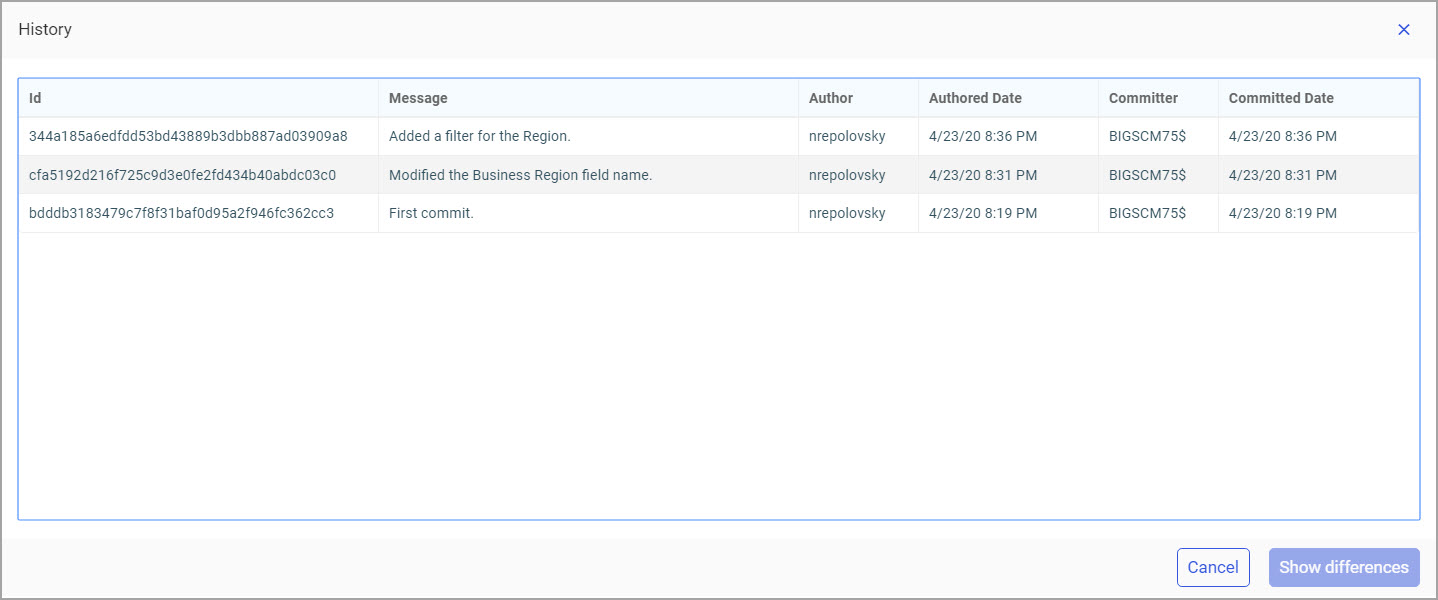
Here you can see the basic information about the commits this item underwent, including the committing user, commit times and messages, and the environment from which the commits were made.
- Holding the Ctrl key, click two commits you wish to compare, and then click Show Differences.
The Git Revision Difference session opens in the new browser window, displaying both versions of the source code for this item side by side, as shown in the following image.
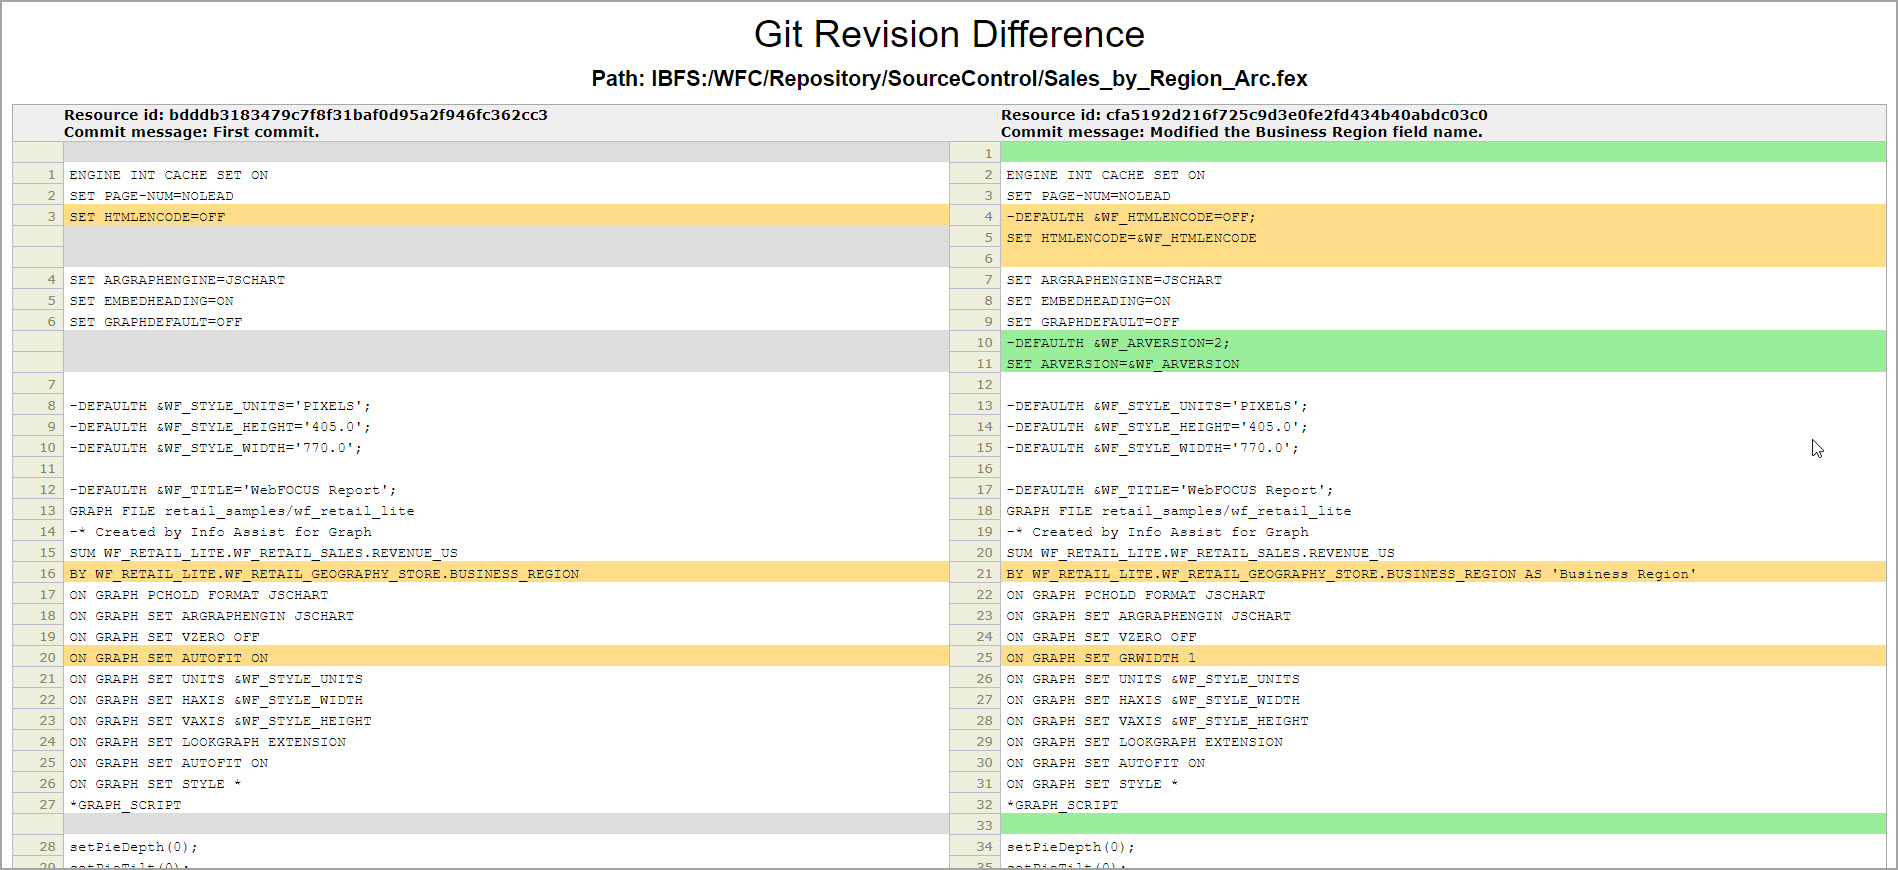
The older version is displayed on the left, the newer one is shown on the right. The lines that were added are highlighted in green, the lines that were removed are highlighted in red.
Note: Only two versions can be selected at one time. If you select two versions that are separated from each other by other commits, the Git Revision Difference session will display all changes that took place between the versions you selected.
Using the Command Editor for Source Control Management
The Command Editor is designed to execute individual GIT commands in a simple and intuitive tool. This capability allows you to perform GIT commands on workspaces as well as individual items. It is also useful for resolving errors that require executing GIT commands that the basic Source Control Management interface does not provide.
Procedure: How to Use the Command Editor
- Right-click an item inside the workspace that is placed under the Source Control Management, and then click Command Editor, as shown in the following image.
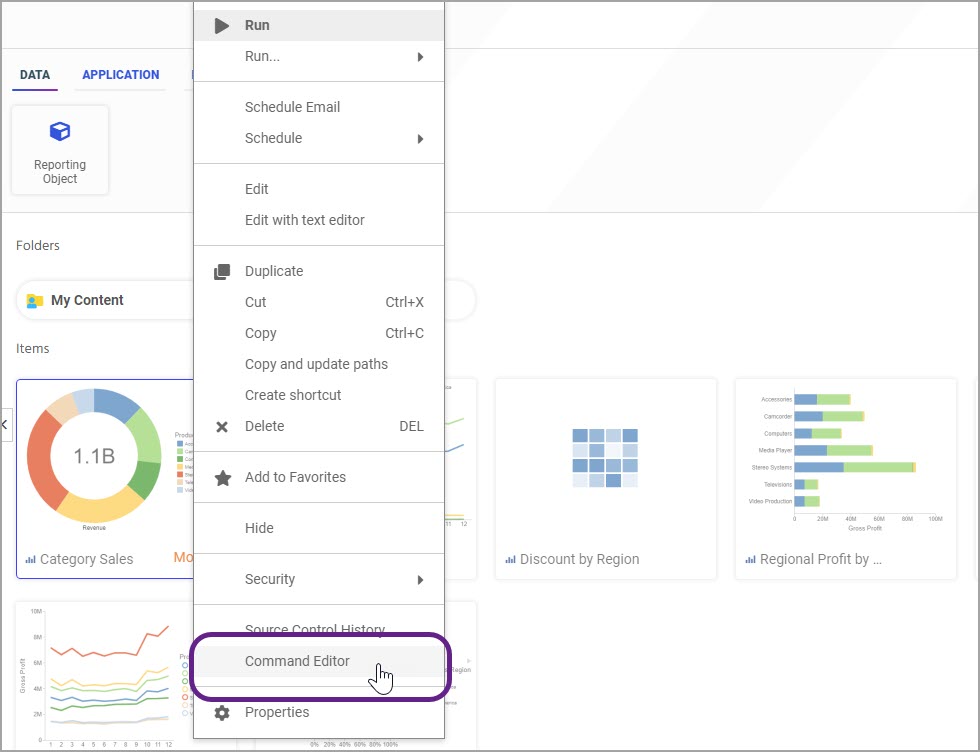
Note: To use the Command Editor on a workspace level, right-click the workspace that was placed under source control, point to Git / Source Control, and then click Command Editor.
The Command Editor dialog box opens.
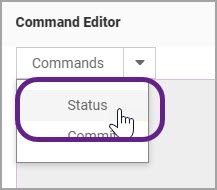
- From the Commands dropdown list, select Status, as shown in the following image.
The Status command options and the item path will display.
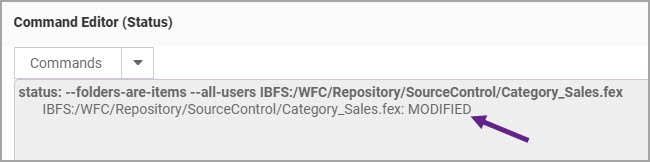
- Select the options and click Submit, as shown in the following image.

The status of the item displays in the upper pane of the Command Editor. This item happens to be recently modified, which is reflected in the status entry, as shown in the following image.
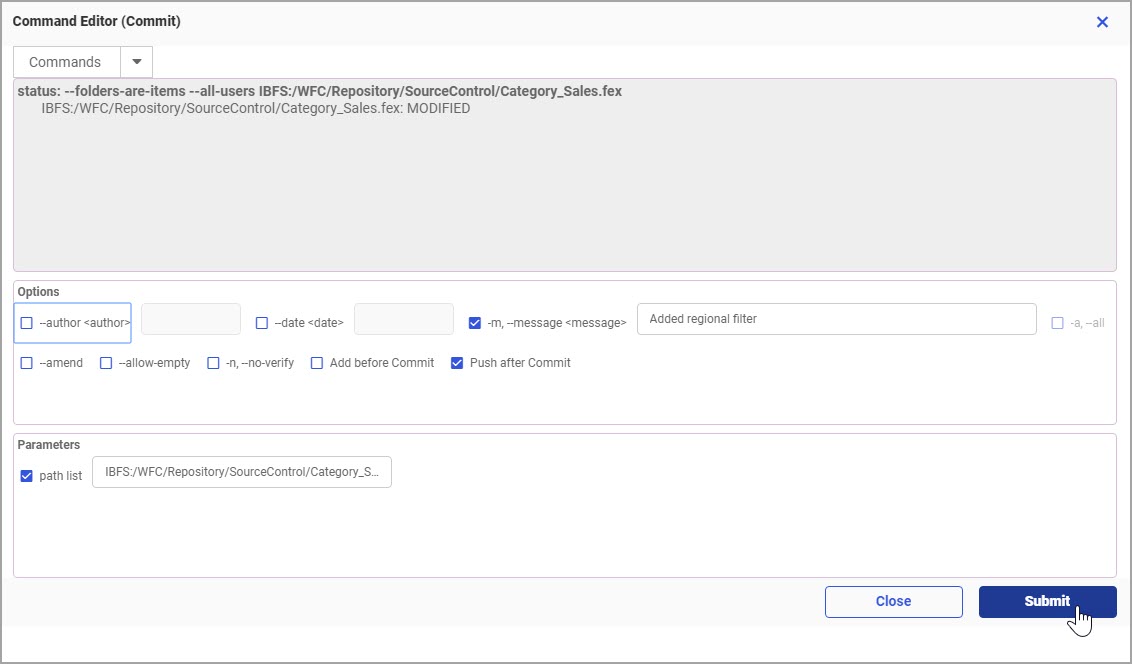
- To commit this item to a remote repository, select Commit from the Commands dropdown list.
- Select the appropriate options and click Submit.
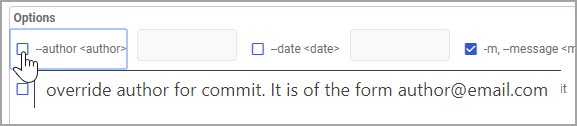
If you are unsure which options to choose, hover your cursor over an option checkbox and view the tooltip, as shown in the following image.
In this example we selected message and Push after Commit, as shown in the following image.
The item is committed to the remote repository.
- Once the command result displays in the upper pane of the Command Editor, scroll down to view the status of your commit, as shown in the following image.
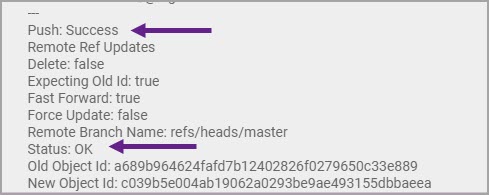
Your commit is successful.
- Click Close to exit the Command Editor.
Understanding GIT Commands
When you open the Command Editor for a workspace or an item, different sets of commands display, depending on the level.
The following commands are available in the Command Editor:
- Status. Provides a visual representation of the state of your item in relation to your remote repository and its conditions. This command is only available for items.
- Commit. Performs a commit request for an individual item, which allows you to synchronize your untracked edits with a remote repository.
- Pull. Performs the task of fetching in changes and merging them. This command is only available for workspaces.
- Push. Sends your committed changes to a remote repository. This command is only available for workspaces.
- Init. Initializes a new, empty repository.
- Clone. Creates a copy of a repository that lives on your computer instead of remote repository server. When you make a clone, you can edit the files in your preferred editor and use Git to keep track of your changes without having to be online.
Note: The repository you cloned is still connected to the remote version so that you can push your local changes to the remote repository to keep them synced when you are online.
- Remote. Helps you to manage connections to remote repositories. It allows you to show which remote repositories are currently connected, but also to add new connections or remove existing ones.
- Branch. Lets you create, list, rename, and delete branches.
- Merge. Takes the independent lines of development created by one branch and applies them into another branch.
Note: If there are no conflicting changes, merge can be done as a pull request through the web interface of your repository provider. Alternatively, it can be done via command line.
- Fetch. Downloads commits, files, and references from a remote repository into your local repository.
- Log. Shows the file or files that have been modified, the number of lines that have been added or removed and also displays a summary line of the total number of files changed and the lines that have been added or removed.
- Reset. Serves to undo local changes to the state of a Git repository.
- Checkout. Lets you navigate between the branches created in the repository. When you use this command to check out a branch, the command updates the files in the working directory to match the version stored in that branch, and it tells Git to record all new commits on that branch.
To learn more about GIT commands and their options, consult the GIT documentation from your remote repository provider.
- Release: 8207
- Category: WebFOCUS Environment, Using the WebFOCUS Home Page
- Product: WebFOCUS Environment
- Tags: Best Practice, Release Features