Adding and Replacing Fields in a Flow
You can add new fields or replace existing fields by creating expressions. You can do this by right-clicking a field in the query, or by using the menu for a field in the sample data panel.
Each field in the sample data panel has a menu icon ( )
)
The menu provides the following options:
- Format. Opens the Edit Display Format dialog box.
- Rename. Enables you to change the title of the field.
- Replace with Expression. Enables you to create a new field with values derived using a calculation.
- Add new Expression. Enables you to create a new field with values derived using a calculation.
- Add to Filter. Filters the field values.
- Sort. Sorts the values in the field.
- Delete. Removes the field from the flow.
Calculated fields also have:
- Properties. Opens the Properties dialog box.
- Edit Define (Advanced). Opens the Advanced Expressions dialog box.
When aggregated, fields also have :
- Edit Compute (Advanced). Opens the Advanced Expressions dialog box.
- Aggregations. Enables you to select an aggregation operator.
- Add to Filter Aggregated. Opens a filter card for the field.
Order by fields also have:
- Sort. Options are Ascending or Descending. The default is Descending.
- Rank. Options are Yes (ranks the values in addition to sorting) or No. The default is No.
- Limit. Options are No Limit, 1, 5, 10, or custom. The default is No.
- Visibility. Options are Show or Hide. The default is Show.
- Add to Filter. Opens a filter card for the field.
Add New Expression and Replace with Expression have the following categories of expression:
- Apply Function. Opens the Function Assistant, which enables you to apply a function calculation to the field.
- Advanced Expression. Opens the Expression Calculator, which enables you to apply a function plus operators to the field.
- Create Group. Enables you to group field values.
- Phonetic Grouping. Groups alphanumeric field values into groups based on their pronunciation. This enables you to identify and correct possible spelling errors.
- Create Decode. Opens a dialog box for replacing existing values with alternate values.
- Create Bins. Opens a wizard for dividing the data values in the field into a specified number of bins based on equal intervals, equal intervals using a formula, or quantiles.
When you create an advanced expression, you use the expression calculator, which is shown in the following example.
Example: Creating a New TOTPRICE Field
To create the TOTPRICE field, click the menu icon in the Sale Price column and click Add New Expression, then Advanced Expressions.
The Add Detail (Define) Expression Calculator opens. It shows the WebFOCUS Functions that are available. Switch to the Columns view by clicking the Columns ordered by folder icon (![]() ).
).
Click the ellipsis (...) in the Format field, and select Numeric, then click OK.
Enter the value Total Price for the Title and TOTPRICE for the Name. For the expression:
- Double-click Sale,Price to add it to the expression.
- Click the asterisk (*) on the toolbar.
- Double-click Quantity,in Stock to add it to the expression.
Optionally, you can click Validate to make sure that the expression is valid. The expression is shown in the following image.

Click OK to add this field to the flow.
Example: Creating a New Field with Gender as Text
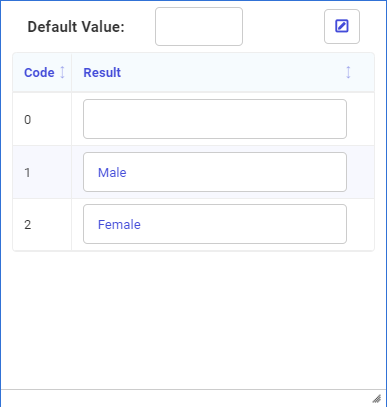
The trip data includes the gender of each subscriber as code 1 or 2 (zero for unknown). For our visualizations, we want to use the labels Male or Female, and when those are not supplied, we will use NULL or Missing.
To create the GENDER_TEXT field:
- Click the menu icon in the gender column, and click Add new Expression, then Create Decode.
A Decode card options.
- Enter Male for 1, Female for 2, as shown in the following image.
- Click the Edit button (
 ) and enter the following values.
Name: GENDER_TEXT.
Title: Gender.
- Click OK
- Click outside the Decode card to close it.
- Release: 8206
- Category: Data Management
- Product: Reporting Server
- Tags: How-to's