Specifying Styling for User Selected Output Formats Using the User Format Menu
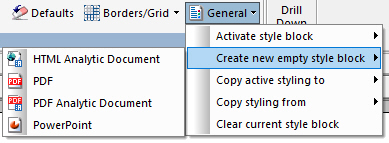
If the output format for a report is set to user selection, the User Format menu becomes available. You can specify different styling for each available format by expanding the User Format menu, pointing to Create new empty styling block or Copy active styling to, and selecting an output format, as shown in the following image.
Once an output format is selected, styling changes that you make are applied only when that format is selected at run-time. Styling for the General output selection is applied to all output formats for which styling is not explicitly applied.
Selecting a format from the Create new empty style block submenu clears all styling for that for the selected format, including the StyleSheet. You can then style the report for the selected format.
If you point to Copy active styling to and then click an output format, you can copy the styling defined for another output format or for general output. Click the User Format menu, point to Activate style block, and select an output format to make additional changes specific to the selected format.
If you have multiple output format styles defined, you can point to Copy styling from and select an output format to apply the styling from that format to the active output format.
To reset the styling changes made for the active output format, open the User Format menu and click Clear current style block. To remove the specified styling for an output format entirely and instead use the styling specified for the General output type, click Delete current style block.
Procedure: How to Specify Styling for User Selected Output Formats
- Create a report in App Studio.
- On the Format tab, in the Output Types group, click Output Format, point to Styled report formats, and click User.
The User Format Selection dialog box opens.
- Clear the check boxes for any output formats that you do not want to be available at run time. Optionally, click the double-arrows in the Options column to specify output format options for each available format, and change the text that displays in the user selection prompt at run time by changing the text in the Enter text for the WFFMT prompt text box.
- Click OK.
On the Report tab, in the Style group, the User Format menu becomes available. It is initially set to General, allowing you to style the report for any output formats that do not have their own styling explicitly specified.
- Optionally, use the commands in the Style group to style the report for general output.
- Configure separate styling for an available output type using one of the following methods.
- In the User Format menu, point to Create new empty style block and click an output format. The selected output format now uses its own style settings, and currently has not styling characteristics defined. The StyleSheet has also been removed for the selected output format. The selected output format is now active for editing.
- In the User Format menu, point to Copy active styling to and click an output format. The selected output format now uses its own style settings, copied from the styling for the active output format.
Note: Styling characteristics are copied to the selected output format, but that output format is not active for editing. To activate the selected output format, click the User Format menu, point to Activate style block, and select the output format that you want to edit.
- Optionally, use the commands in the Style group to style the report for the active output format.
- Repeat steps 6 and 7 for any other output formats that you want to have their own unique styling.
- Run the report.
When you run the report with an output format for which you have defined unique styling, that styling is applied. When you run the report with an output format that you did not style separately, the styling characteristics defined for general output are used.
- Release: 8205
- Category: Desktop Development
- Product: App Studio