Classifying Metadata During Upload and Using it in a Data Flow
Metadata Classification examines your data and assigns classifications to the columns, which can then be used to match columns from separate data sources. In this release, you can classify data that you upload, and use it to match fields in a Union in a Data Flow.
When uploading a data file, you can now view the recommended metadata classification values for each character-valued column. You can choose to keep the recommended values, or to change them.
Including classification values in your metadata improves the accuracy of mapping column tables correctly to each other. This is useful if you are integrating data from multiple sources, or if integrating data into a system with a predefined hierarchy.
The new Data Classification engine is a machine learning application, provided as a service, that will base class assignments on examining actual data values. It is trained by being given access to large volumes of data gathered throughout the world. This application will continually learn more about data and how to classify it, and new classes will be added as needed.
Prerequisites for Metadata Classification
In prior releases, automatic matching of columns from multiple data sources was based either on primary key/foreign key relationships in relational tables or, if those were not available, column names and formats. The new Data Classification engine is a machine learning application, provided as a service, that will base class assignments on examining actual data values. It is trained by being given access to large volumes of data gathered throughout the world. This application will continually learn more about data and how to classify it, and new classes will be added as needed.
A customer site wanting to use the Data Classification application will have to submit proprietary data to the classification API. To ensure the safety and integrity of proprietary data, the API will be installed as a service in the customer environment, and will be accessible only to the customer. Once the data is examined, feature vectors with encoded values will be sent to another service, available in the WebFOCUS or Omni environment, which will use these vectors to recommend class assignments for columns. If a classification cannot be recommended based on the known classes, an attempt will be made to classify columns based on column names and formats. You will be able to view and change the classifications prior to saving them in a synonym. Once they are stored in a synonym, they will be used to suggest column matches when you create a Union in a Data Flow on the server. In future releases, the functionality will be extended to other environments.
After the services are installed, you must add the paths to the services in the edaserve.cfg file on the server.
Changes Needed in the edaserv.cfg Configuration File
The URLs pointing to the services (APIs) must be added to the edaserve.cfg configuration file on the WebFOCUS Server.
- On the Server Console, navigate to the Workspace page using the Tools menu.
- On the Resources Tree, expand Configuration Files.
- Right-click Workspace - edaserve.cfg and click Edit.
- Enter values for the following keywords:
lblfeat_url = url_to_service_that_encodes_values
lblpred_url = url_to_service_calculates_labels_based_on_encoded_values
where:
url_to_service_that_encodes_values
Is the URL to the service that resides in the customer environment. For example:
lblfeat_url = https://myserver/api/1.0.0
url_to_service_calculates_labels_based_on_encoded_values
Is the URL to the service that resides in the WebFOCUS and Omni environment environment. For example:
lblpred_url = https://ibiserver/api/1.0.0
This service is called using the feature vector created by the first service and returns the classification for the column.
The Text Editor should look similar to the following.
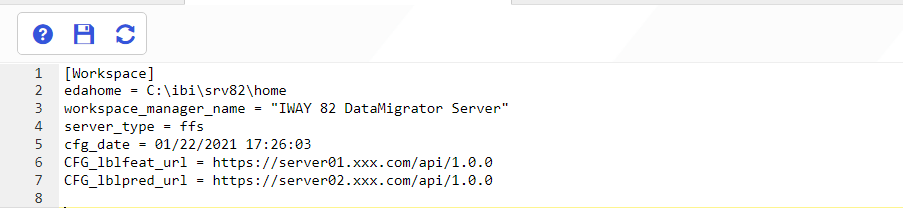
- Click the Save icon, and close the tab.
How to Change Metadata Classification Values When Uploading Data Files
You can change the metadata classification values for your data during the upload process.
- From the Home Page or Server Get Data page, upload an Excel or delimited file using Get Data.
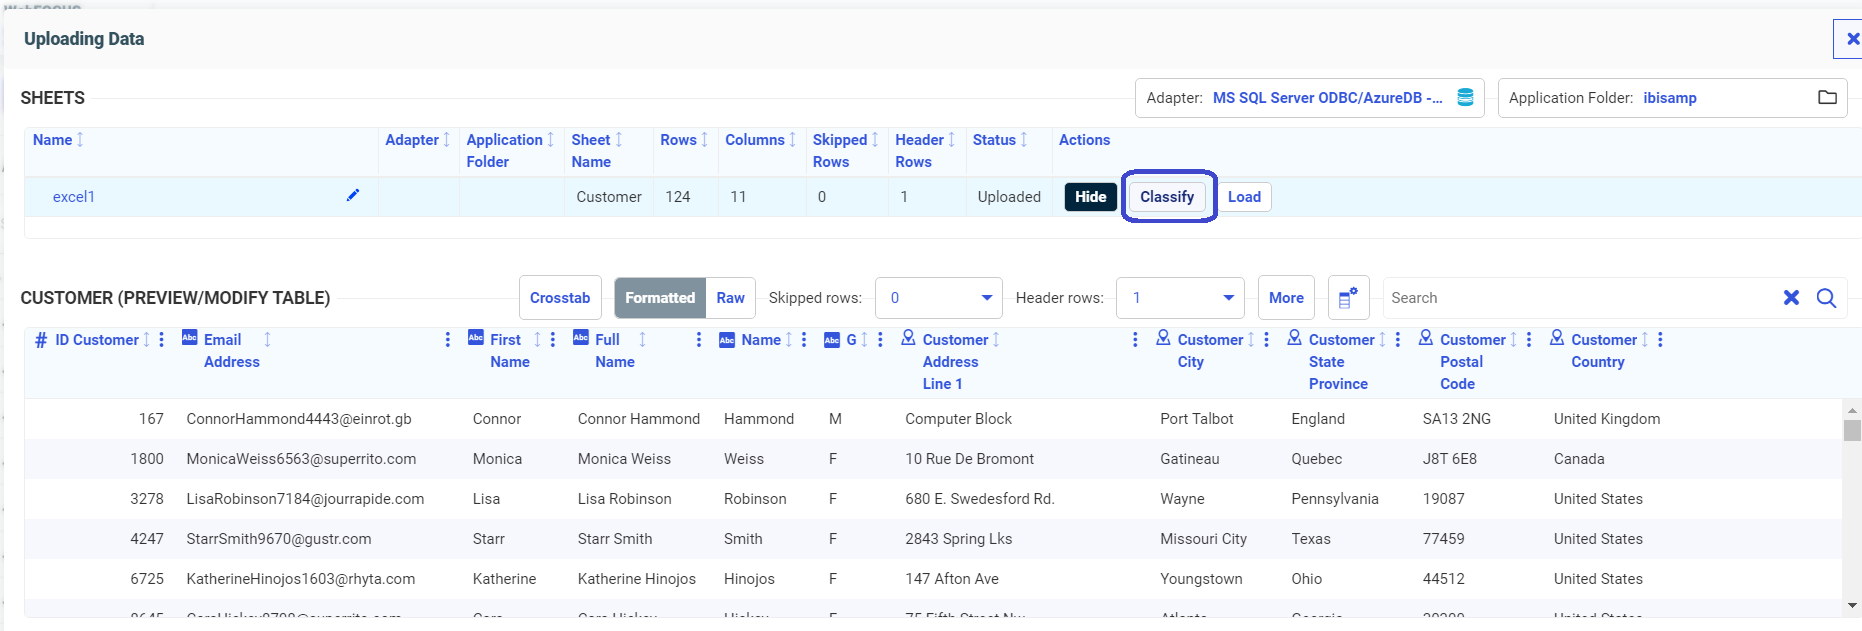
A preview page opens, as shown in the following image.

- Click the Classify button.
The Recommended Classifications page opens, as shown in the following image.
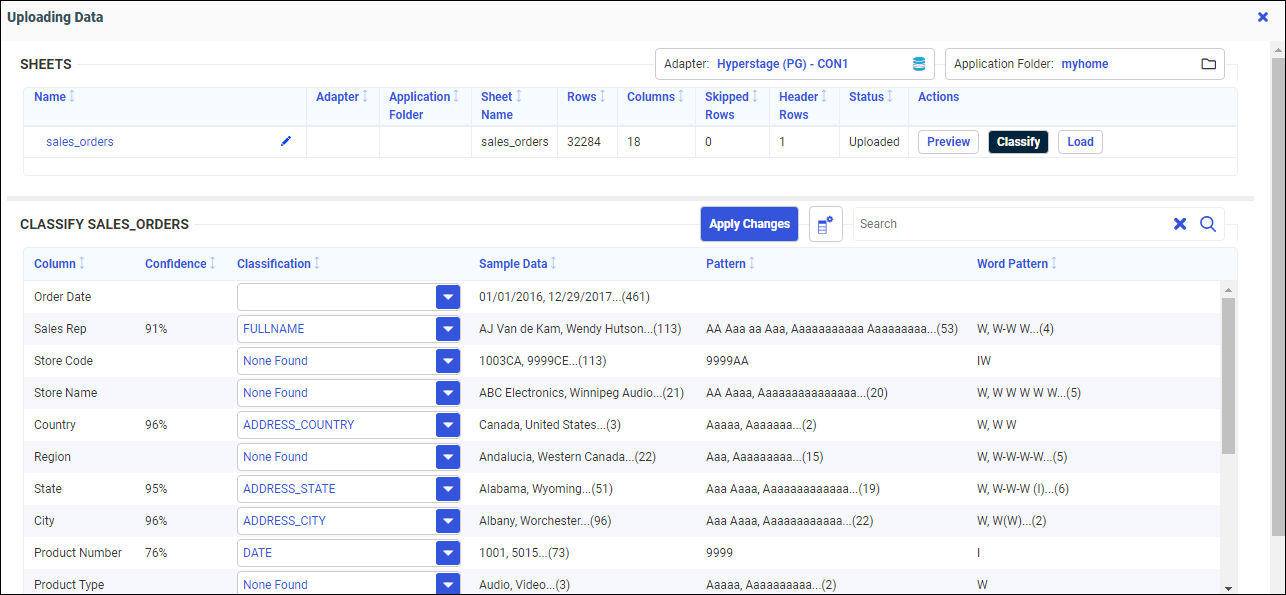
When a recommended classification can be made, the columns that were classified have a Confidence Level associated with them, which indicates the probability that the classification is correct.
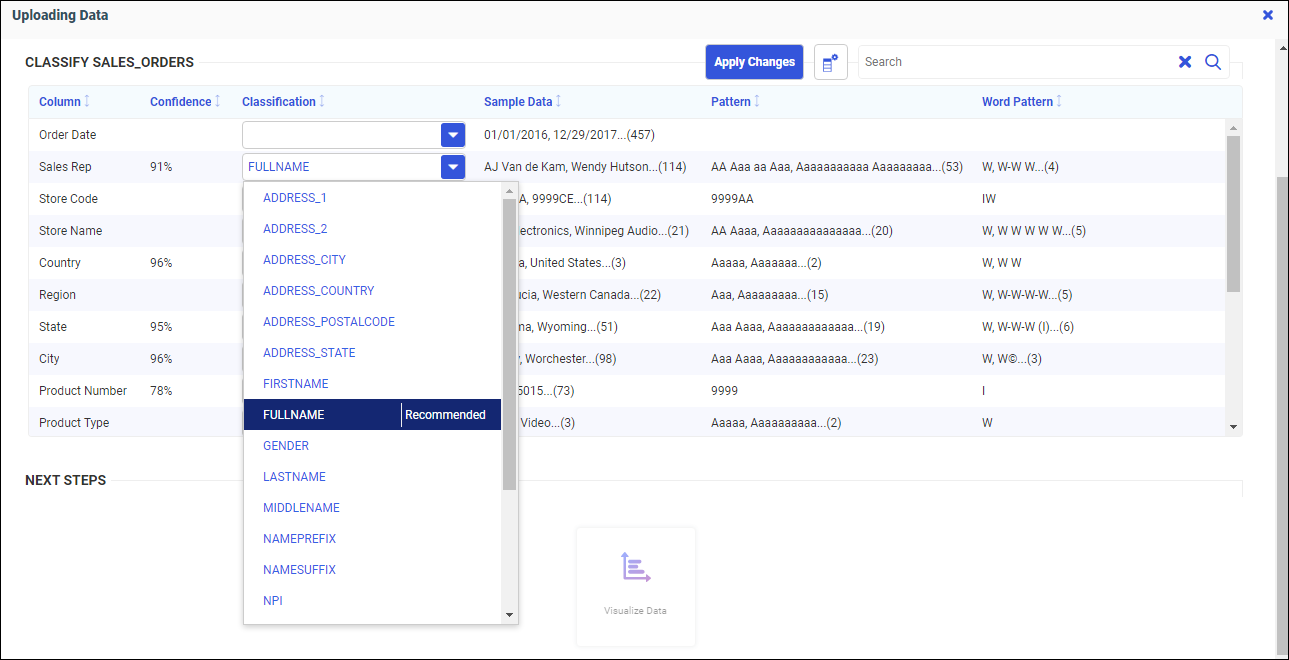
You can select from a column list of classifications, or enter your own classification, by typing into the text box next to the column. Clicking a column drop-down arrow shows the list of classifications, and indicates which is recommended, as shown in the following image.
- Click Apply Changes.
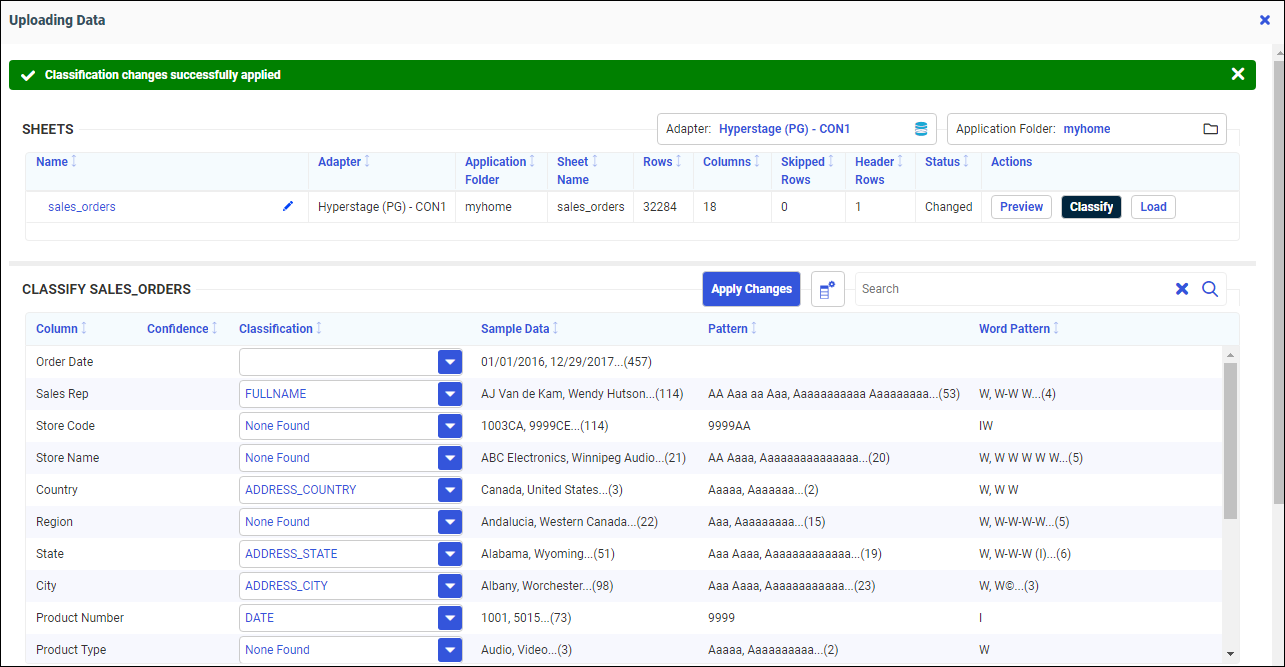
Your changes are applied, as indicated by a green message bar at the top of the page, as shown in the following image.
Once your data is loaded, with the proper permissions to edit synonyms, you can leverage further capabilities by accessing the server.
Using Metadata Classifications in a Union in a Data Flow
In this release, the classifications are only available when you upload a file from the Home Page or the Get Data page of the Server Console. We will upload two Excel files, and examine the classifications, then use the two Excel files in a Union.
In the server environment, you can upload a file by clicking Get Data on the Applications page of the Server Console.
Classifying Excel1
Click Excel in the Local Files section, and a file picker dialog box opens, as shown in the following image.
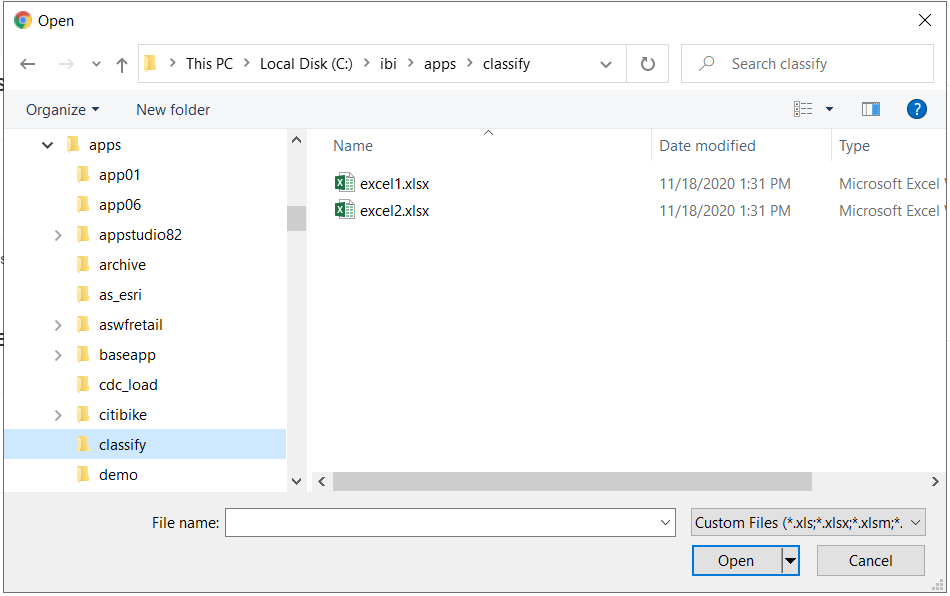
Selecting Excel1 and clicking Open opens the Upload Data page. If the Metadata Classification feature has been installed and configured, the Upload Data page has a Classify button, as shown in the following image.
Clicking the Classify button opens the Recommended Classifications page, as shown in the following image.
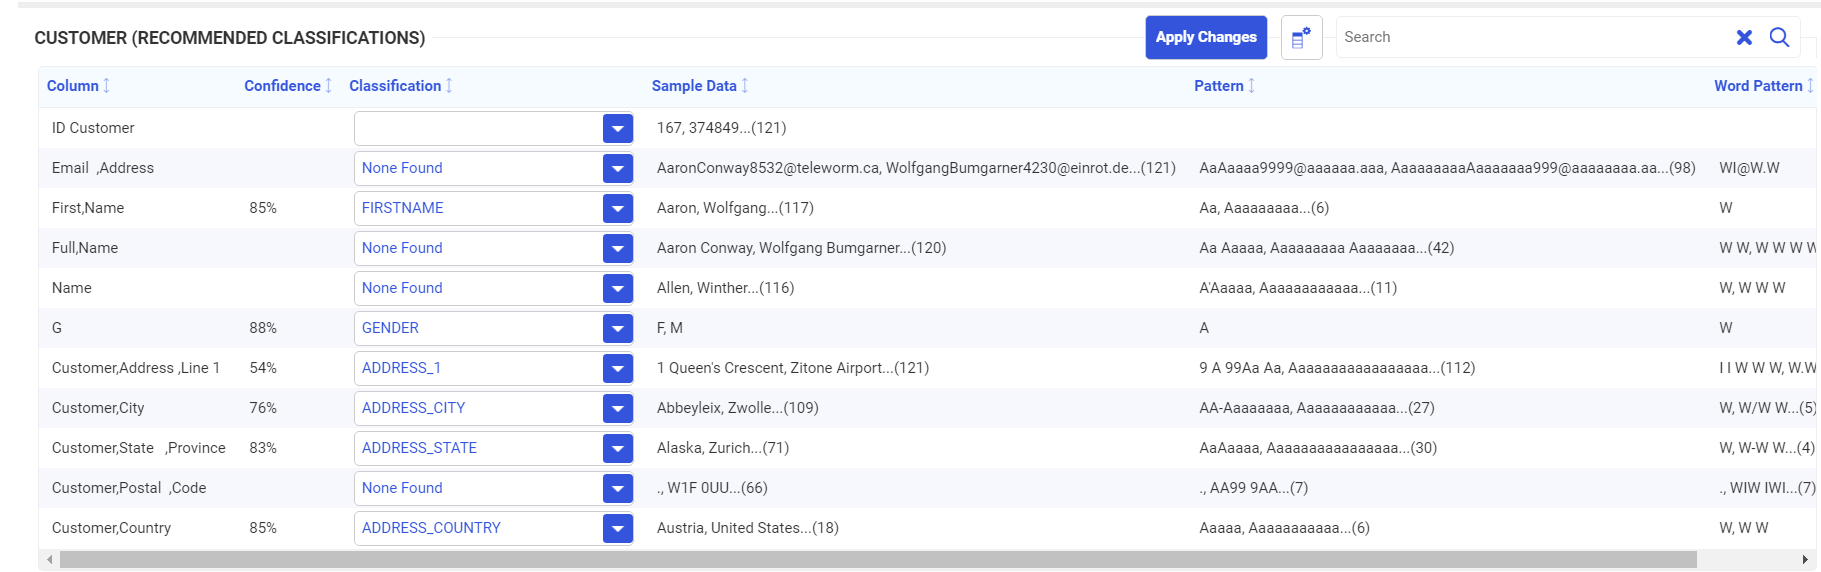
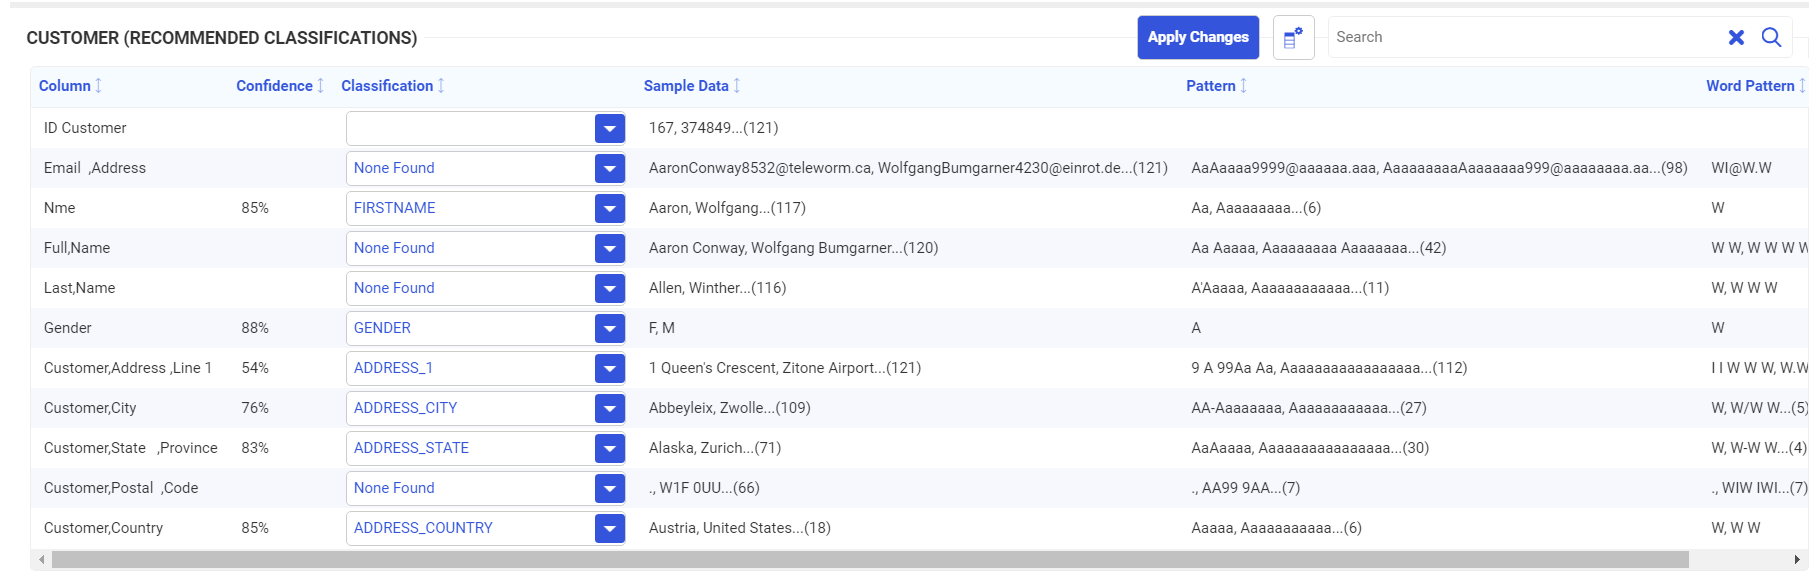
Note that not all columns were classified. You can select from the list of classifications for a column, or enter your own classification, by typing it into the text box next to the column. The columns that were classified have a Confidence Level associated with them. The confidence level represents the probability that the classification is correct.
In this case, select FULLNAME for Full,Name and LASTNAME for Name, as shown in the following image.

Click Apply Changes. A green message bar at the top of the page shows that the changes were successfully applied.
Click Load.
The file is uploaded, and the synonym is generated with the classifications added, as shown in the following partial synonym.
FILENAME=EXCEL1, SUFFIX=MSODBC  , BV_NAMESPACE=OFF, $
  SEGMENT=EXCEL1, SEGTYPE=S0, $
    FIELDNAME=ID_CUSTOMER, ALIAS=ID_CUSTOMER, USAGE=I9, ACTUAL=I4,
      MISSING=ON,
      TITLE='ID Customer', $
    FIELDNAME=EMAIL___ADDRESS, ALIAS=EMAIL___ADDRESS, USAGE=A42V, ACTUAL=A42V,
      MISSING=ON,
      TITLE='Email  ,Address', $
    FIELDNAME=FIRST_NAME, ALIAS=FIRST_NAME, USAGE=A11V, ACTUAL=A11V,
      MISSING=ON,
      TITLE='First,Name',
      CATEGORY='FIRSTNAME',  CONFIDENCE=0.853071,  $
    FIELDNAME=FULL_NAME, ALIAS=FULL_NAME, USAGE=A26V, ACTUAL=A26V,
      MISSING=ON,
      TITLE='Full,Name',
      CATEGORY='FULLNAME',  $
    FIELDNAME=NAME, ALIAS=NAME, USAGE=A15V, ACTUAL=A15V,
      MISSING=ON,
      TITLE='Name',
      CATEGORY='LASTNAME',  $
    FIELDNAME=G, ALIAS=G, USAGE=A1V, ACTUAL=A1V,
      MISSING=ON,
      TITLE='G',
      CATEGORY='GENDER',  CONFIDENCE=0.883651,  $
    FIELDNAME=CUSTOMER_ADDRESS__LINE_1, ALIAS=CUSTOMER_ADDRESS__LINE_1, USAGE=A57V, ACTUAL=A57V,
      MISSING=ON,
      TITLE='Customer,Address ,Line 1',
      GEOGRAPHIC_ROLE=ADDRESS_LINE,
      CATEGORY='ADDRESS_1',  CONFIDENCE=0.547940,  $
Classifying Excel2
Follow the same steps for file Excel2. The Classification Screen is shown in the following image.
Note that the first name column is called Nme in this file (it was called Name in Excel1), and the gender column is called GENDER (it was called G in Excel1).
Again, select FULLNAME for Full,Name and LASTNAME for Name, click Apply Changes, and then Load.
Creating a Union
Now that the files have been uploaded and the synonyms have been generated with the classifications, click the New (+) button on the Server Console ribbon, and click Flow.
The Data Flow canvas opens.
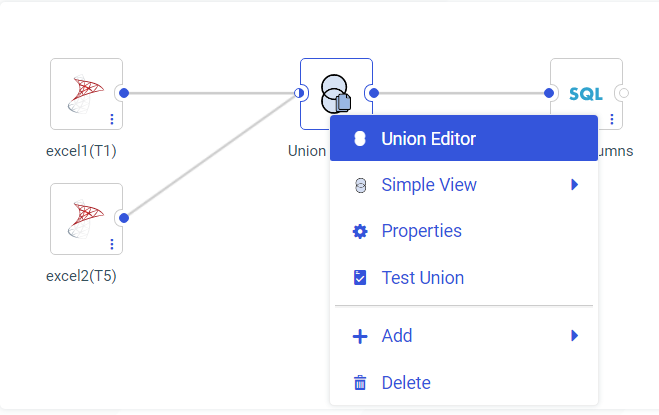
Drag Excel1 to the flow canvas, then drag Excel2 to the canvas and select Union, as shown in the following image.

A Union object is added to the flow. Right-click the Union object, and click Union Editor, as shown in the following image.
The Union Editor opens, as shown in the following image.
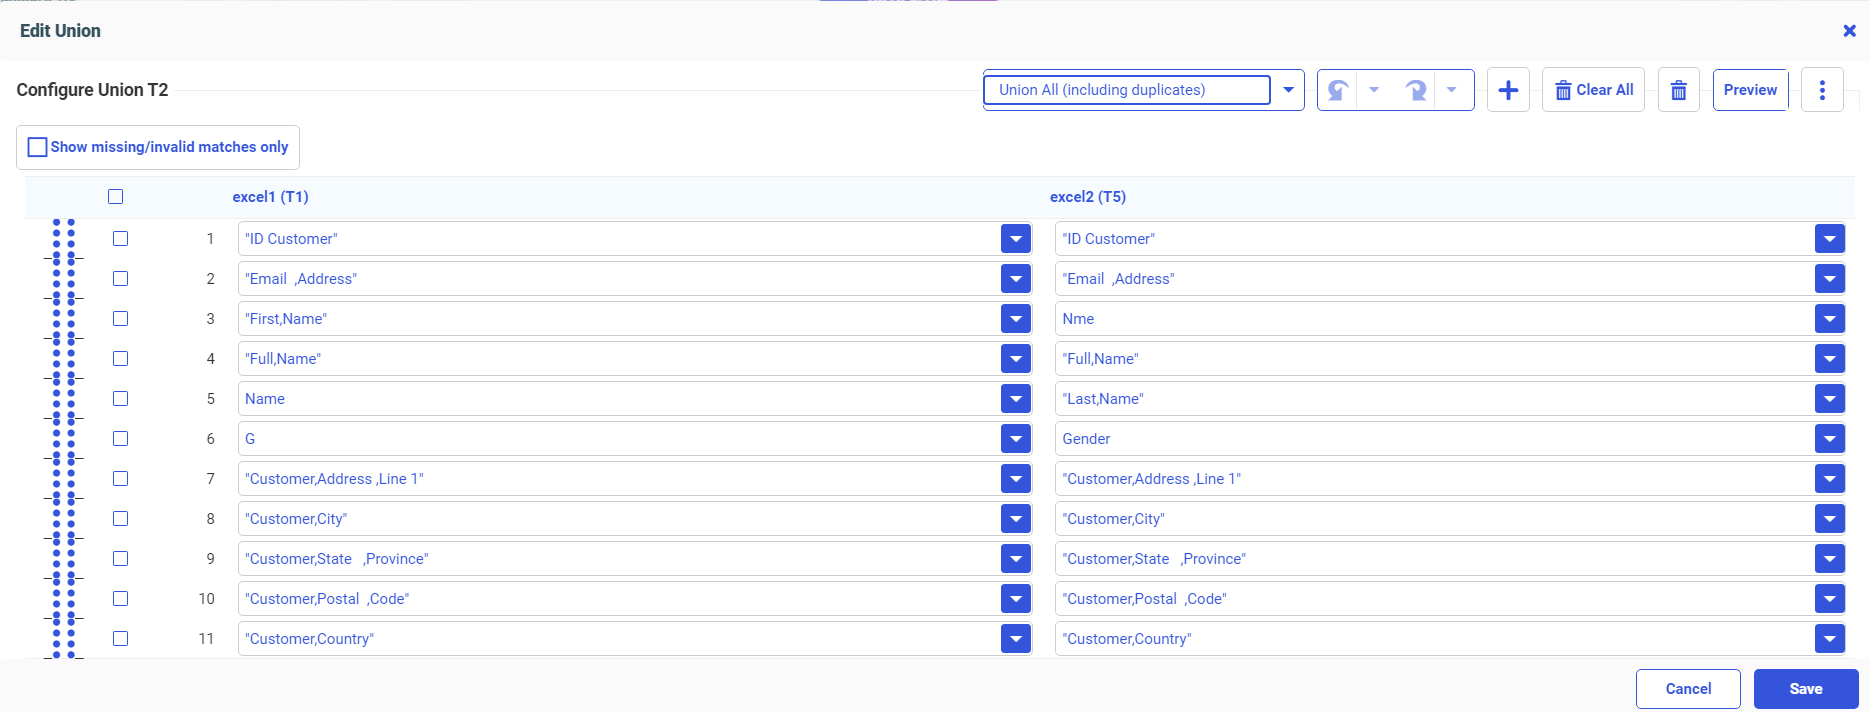
The classified fields are correctly matched. Fields that were not classified, such as Customer ID and Email Address, are matched based on column names and formats. If any matches are missing or incorrect, you can correct them using the drop-down lists.
- Release: 8207
- Category: Connecting to Data
- Product: iWay/OMNI, WebFOCUS Home Page
- Tags: Release Features