Scheduling a Data Flow
You can create a schedule that will run a data flow on a specified data and time, or on a recurring basis. You can configure where the logs and outputs are sent. You can also send emails on start, completion, or failure.
To create a schedule for a flow, click the Schedule and E-Mail button (![]() ) on the ribbon.
) on the ribbon.
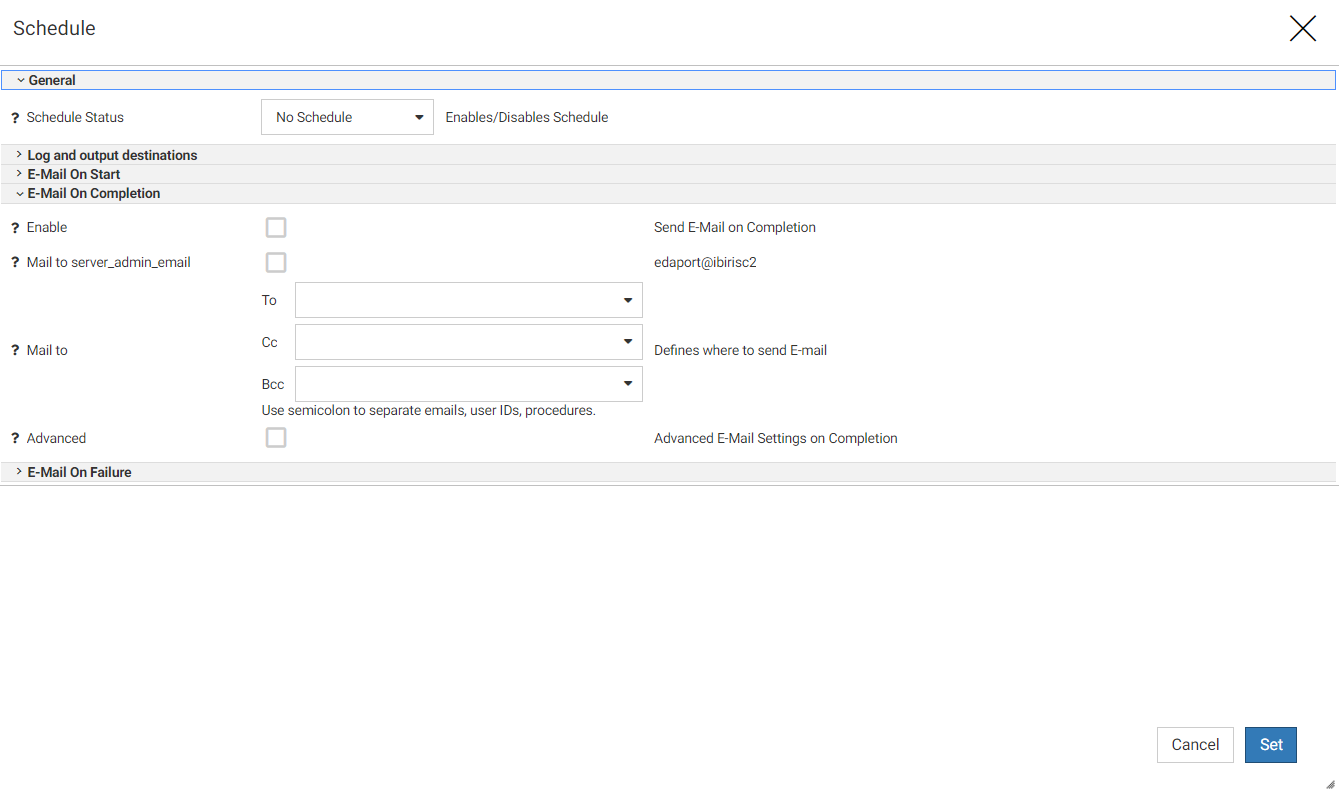
The Scheduler window opens, as shown in the following image.
Select or enter values for the following parameters:
General
Schedule drop-down list. Select No Schedule (the default), Inactive (a schedule exists but is not active), Active.
If you select Inactive or Active, the following fields open.
- Schedule Type. Select from Run Once (the default), Recurring, Multi-Day, or Run when server starts.
- Start Date. By default shows the current date. If you click it, a calendar widget opens for selecting a start date.
- Start Time. Specifies a forced start time. There are drop-down lists for hour and minute. By default 23 and 59 are selected.
- Specify Stop Time. Select this check box if you want to force an end time.
- Stop Time. Specifies a forced stop time. There are drop-down lists for hour and minute. By default 23 and 59 are selected.
Log and Output Destinations
The flow output is a report similar to the following:
(ICM18122) Request - citibike/dflow02.fex (Owner: USER1) submitted.
(ICM18741) citibike/citibike_tripdata01 type Hyperstage (PG) New target
(FOC2662) BULK LOAD PROCESS STARTED AT 12.05.04
(FOC2661) TARGET FILE CITIBIKE/CITIBIKE_TRIPDATA01
(ICM18950) Command Invoked to Load Data: C:\ibi\srv82\ibi\srv82\home\hs\bin\dlp.exe
(ICM18745) Commit forced at: 1000000 for 1000000 row(s)
(ICM18745) Commit forced at: 2000000 for 1000000 row(s)
(ICM18745) Commit forced at: 2077758 for  77758 row(s)
(FOC2663) BULK LOAD PROCESS ENDED AT 12.07.29, ELAPSED TIME = 00:02:25.219
(FOC2661) TARGET FILE CITIBIKE/CITIBIKE_TRIPDATA01
CITIBIKE/citibike_tripdata01 HELD AS SQLHYPG TABLE
1
0 NUMBER OF RECORDS IN TABLE=  2077758  LINES=2077758
0
(ICM18744) Ending Load
(ICM18040) Return Code = 0
(ICM18076) Request: citibike/dflow02.fex - finished processing
(ICM18007) CPU Time : 106125
The log is a complete list of the flow processing. Select or deselect the following:
- Send log to ETLLOG and output to disk. This is selected, by default. ETLLOG is the DataMigrator log file.
- Send log to EDAPRINT. This is deselected, by default. EDAPRINT is the server log file.
- Send log and output as attachments to E-mail if E-mail Notification 'On Completion' or 'On Failure' is requested. This is selected, by default.
- Embed HTML output into E-Mail message. This is selected, by default. If you deselect it, the output will be sent as an attachment, instead of inline.
Email Options. An SMTP server node must be configured in order for the server to send emails. This is normally done during installation but can be configured later, if necessary.
E-Mail On Start
Enter or select values for the following parameters.
Enable. Select this check box to send email when the flow starts.
Mail to server_admin_email. Select this check box to send an email to the configured Server Administrator email address, when the flow starts.
Mail to. Enter one or more email addresses, separated by semi-colons (;), in the To field and, optionally, in the Cc and Bcc fields.
Advanced. Select this check box to open the following additional fields:
- Mail to addresses defined in procedure. You can enter the name of, or navigate to, a procedure that defines the email addresses.
- Importance. Select from Normal (the default), Low, or High.
- Subject. Enter a subject for the email message.
- E-Mail Message. Enter a message to be included in the email body.
E-Mail On Completion
Enter or select values for the following parameters.
Enable. Select this check box to send email when the flow completes.
Mail to server_admin_email. Select this check box to send an email to the configured Server Administrator email address, when the flow completes.
Mail to. Enter one or more email addresses, separated by semi-colons (;), in the To field and, optionally, in the Cc and Bcc fields.
Advanced. Select this check box to open the following additional fields:
- Mail to addresses defined in procedure. You can enter the name of, or navigate to, a procedure that defines the email addresses.
- Importance. Select from Normal (the default), Low, or High.
- Subject. Enter a subject for the email message.
- E-Mail Message. Enter a message to be included in the email body.
E-Mail On Failure
Enter or select values for the following parameters.
Enable. Select this check box to send email if the flow fails.
Mail to server_admin_email. Select this check box to send an email to the configured Server Administrator email address, if the flow fails.
Mail to. Enter one or more email addresses, separated by semi-colons (;), in the To field and, optionally, in the Cc and Bcc fields.
Advanced. Select this check box to open the following additional fields:
- Mail to addresses defined in procedure. You can enter the name of, or navigate to, a procedure that defines the email addresses.
- Importance. Select from Normal (the default), Low, or High.
- Subject. Enter a subject for the email message.
- E-Mail Message. Enter a message to be included in the email body.
When you are finished, click Set.
- Release: 8206
- Category: Data Management
- Product: Reporting Server
- Tags: How-to's