Preferences for Managing Code
The Options menu, invoked from the Options button on the toolbar, presents preferences that help you manage your code.
You can selectively turn these preferences off or on in a file, as shown in the following image.
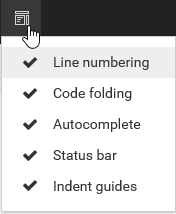
Preferences include:
- Line numbering. Displays line numbers, including blank lines, in the sidebar. The default value is on.
- Code folding. Allows you to selectively collapse and expand sections of a currently edited file, so that you can look at the code structurally. The default value is on.
- Autocomplete. Allows progressive addition and suggestion of code as you type. Autocomplete is available for FOCEXEC, HTML, JavaScript, CSS, and Python files. Autocomplete is not supported for SQL, R, STY, and TXT files. The default value is on.
- Status bar. Displays contextual information for the active file being edited. The default value is on.
- Indent guides. Visually displays indent levels in code. The Tab key moves four columns at a time, putting invisible tab characters into the file. The default value is on.
Line Numbering
The Editor supports line numbering, which displays line numbers for each line you create in the Editor, including blank lines. The line numbers appear in the sidebar. This is useful when you need to refer to specific lines in a file.
You can selectively turn line numbering off or on from the Options menu on the toolbar. The default value is on.
The following image displays a WebFOCUS procedure, with line numbers in the sidebar, for each line of code.

Code Folding
The Editor supports code folding, which lets you selectively collapse and expand sections of code in a file you are currently editing. This is useful when you need to manage large amounts of code, and view only those subsections that are relevant.
You can selectively turn code folding off or on from the Options menu on the toolbar. The default value is on.
Code folding is supported in a FOCEXEC for WebFOCUS DEFINE, TABLE, GRAPH, Dialogue Manager, and inline Stylesheet code. It is also supported for JavaScript, CSS, HTML, and Python files. Code folding is not supported for SQL and R files.
The following image displays a WebFOCUS procedure, with the code-folding toggle icons included in the sidebar (lines 1, 14, 15, 23, 26, and 27).

To collapse the DEFINE statement, click the code-folding toggle icon on the DEFINE FILE command line (line 1). Note that lines 1 through 14 are collapsed, as shown in the following image.

To collapse the inline StyleSheet code, click the code-folding toggle icon on the ON TABLE SET STYLE command line (line 23). Note that lines 23 through 26 are collapsed, as shown in the following image.

To collapse the TABLE request, click the code-folding toggle icon on the TABLE FILE command line (line 15). Note that lines 15 through 27 are collapsed, as shown in the following image.

The following procedure shows the code folding icons on comment lines (lines 1 and 3) and Dialogue Manager commands (lines 4 and 6).

To collapse the comment lines, click the code folding icon on line 1. Note that lines 1 through 3 are collapsed, as shown in the following image.

To collapse the Dialogue Manager commands, click the code folding icon on line 4. Note that lines 4 through 6 are collapsed, as shown in the following image.

Reference: Usage Notes for Code Folding
- The code folding icons appear if there is more than one line for a block of code or commands for which code folding is supported.
- To expand a section of code that is collapsed, you can click the code-folding toggle icon or the double-headed arrow icon
 at the end of the command line.
 - Comment lines, which begin with a dash followed by an asterisk (-*), are collapsed separately from other Dialogue Manager commands.
- Adding a blank line between blocks of similar code, such as comment lines or Dialogue Manager commands, separates the block of code and a new segment for code folding is created.
- In files, where nested blocks of code are indicated by starting and ending curly brackets { }, such as JavaScript and CSS files, code-folding icons are enabled on the lines where the open and close curly brackets are displayed.
- If the cursor is currently in a block of code, you can press Alt+0 to collapse all other regions, except for the block of code currently in focus.
- You can also press Shift+Alt+0 to expand all regions of code.
- When using Search and Replace features, if the search criteria is met within any collapsed lines, the lines are automatically expanded to show the search criteria found.
Autocomplete
Autocomplete is a function that allows progressive suggestion of code as you type.
You can selectively turn Autocomplete off or on from the Options menu on the toolbar. The default value is on.
When typing code, a list of suggestions will display below the text, in alphabetical order. You can use the up and down arrow keys to navigate to the desired value and press Enter to select the value.
The suggestion list displays one of the following labels, on the right of each suggestion:
- WebFOCUS keyword. Indicates that a command is a WebFOCUS keyword, such as CLEAR and COLUMN, in the following example.
- local. Is used for words that are not WebFOCUS keywords, such as CITY_NAME. The label, local, will be displayed on the second or later attempts to type the word.
Note: In the following example, the variables COG_US and CITY_NAME are not WebFOCUS keywords, they are local to the syntax. On the second attempt or later attempt to type the letter C, both variables display as local, as shown in the following image.

Autocomplete is available for FOCEXEC, HTML, JavaScript, CSS, and Python files. Autocomplete is not supported for SQL, R, STY, and TXT files.
Procedure: How to Create a Simple Procedure With Autocomplete
- On the Editor toolbar, from the Options menu, select Autocomplete.
- Create a new GRAPH request.
- Type the letter G in the Editor.
Note that the command GRAPH is suggested, as shown in the following image.

Note also that GRAPH is a WebFOCUS keyword.
- Scroll and press Enter to select GRAPH.
- Type the letters FI in the Editor.
Note that the command FILE is suggested, as shown in the following image.

- Scroll and press Enter to select FILE.
- Type the name of the Master File.
Note: Autocomplete is not supported for Master Files.
- Type the letter P in the Editor.
Note that the command PRINT is suggested, as shown in the following image.

- Scroll and press Enter to select PRINT.
- Type a field from the Master File, for example, CITY_NAME.
- Press Enter to move to the next line and then type the letter E in the Editor.
- The command END is suggested, as shown in the following image.

- Scroll and press Enter to select END.
Status Bar
The Status bar displays contextual information for a open file at the bottom of the Editor.
You can selectively turn the status bar off or on from the Options menu on the toolbar. The default value is on.
Note: The Status bar is global for the Editor environment. If you uncheck the Status Bar option in one tab, this is applied to all open tabs, including any new tabs you create in the Editor.
The following values display in the Status bar:
- Length. Length, in characters, of the text in the active file.
- Lines. Total number of lines in the current file, including blank lines.
- Line. Line number of cursor position.
- Column. Column number of the cursor position.
- Insert. Indicates the status of insert or overtype mode. This setting is controlled by the Insert key on your keyboard. When the value for Insert is ON, your keyboard is in insert mode, and text is placed in front of the cursor position. When the value for Insert is OFF, your keyboard is in overtype mode, and existing characters are overwritten.
- Caps Lock. Indicates the status of Caps Lock. This setting is controlled by the Caps Lock key on your keyboard. No value is shown when Caps Lock is off. The value on the Status bar will not change when you press the Caps Lock key. The value is detected and changed to CAPS when you type a character on the keyboard.
- Num Lock. Indicates the status of Num Lock, when working with the numeric keypad. This setting is controlled by the Num Lock key on your keyboard. No value is shown when Num Lock is off. The value on the Status bar will not change when you press the Num Lock key. The value is detected and changed to NUM when you type a number using the numeric keypad.
The following image shows an example of values displayed in the Status bar.

Indent Guides
Indent guides are useful in helping you understand the structure of code by showing indentation levels and to quickly find where a block of code starts and ends.
You can selectively turn indent lines off or on from the Options menu on the toolbar. The default value is on.
Clicking the Tab key inserts a 4-space indent. The indent guides are represented by vertical light gray lines, as shown in the following image.

- Release: 8207
- Category: Security and Administration
- Product: Security and Administration
- Tags: How-to's, Release Features