WebFOCUS Designer


Filtering Data on Designer Pages

WebFOCUS Designer filter controls are versatile and allow you to facilitate multiple filtering scenarios. Depending on the needs of your enterprise and on the specifics of the data that you are using, you can configure filter controls to fit your unique needs. Examples below show you different types of controls and how to use them.

Configuring Filter Control and Filter Grid Properties

You can configure the properties of the filter grid using the Properties panel, which is context-sensitive. For example, when you click a filter cell, the cell style properties open in the Properties panel. When you click a filter control, the general and style properties for this control open in the Properties panel.

The Properties panel for a cell is shown in the following image. When you configure these properties, you modify the alignment of content within a cell or change the style layout of the filter grid.

Adding Filters to Pages in WebFOCUS Designer

Creating a page filter in WebFOCUS Designer is a quick and intuitive process. Whenever you add parameterized content item to the canvas, such as a report with parameters or chart with parameters, Designer recognizes the parameters and creates filters for them automatically. The tool then notifies you of any available filters with a notification, and a badge count is overlaid on the Quick Filter button, as shown in the following image.

Editing Page, Section, and Container Properties

The Properties panel displays the properties for the element that is selected. To access container properties, click a container or item with the Properties panel open. To access section properties, click the grid inside the canvas. To access page properties, click the page header or the toolbar. If the page header and the toolbar are hidden, you can access page properties by clicking the canvas outside a grid section.

The following properties are available for pages.

Settings tab:

Resizing Content on a Page

You can resize content on a page, at any time, using the sizing handles and the shaded placement area that appear on the canvas. When you hover over an item on the canvas, a series of handles appear. Drag a handle in the direction that you want to resize the item, as shown in the following image.

Resize item

Sharing Content in WebFOCUS

Each domain in the repository, except the Public domain, comes with the private My Content folder. Whenever you create content inside the My Content folder, this content remains private and only visible to you, unless you share it with other users and groups. You can share content in one of two ways:

Sharing Content With Users

Sharing is a feature that is generally used to enable users to share private content residing in their My Content folders with authorized colleagues.

WebFOCUS makes shared resources available to other appropriate users through a special Shared Content folder. The Shared Content folder is a virtual folder that appears automatically in a folder whenever there is shared content inside that folder.

Using Your Extension in a WebFOCUS Request

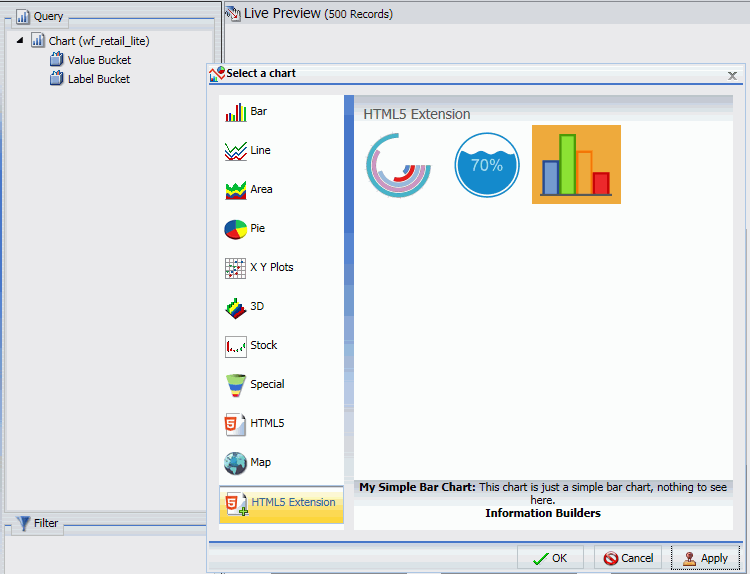
If you have installed and configured your extension as described, your extension will be available for use in the WebFOCUS tools as a chart type. When creating a chart using InfoAssist, charts are available in the Other format category under HTML5 Extension, as shown in the following image.

When creating a chart using WebFOCUS Designer, chart extensions are available in the Custom category when you expand the chart picker, as shown in the following image.

Using the Chart Extension API

To see examples of everything that the chart extension API provides, look at com.ibi.simple_bar.js. It is divided into two main parts, chart rendering and extension configuration.

If you implement the extension API version 2, you can retrieve the field name and number format associated with a data bucket entry. To use API 2 and get a bucket entry field name or number format, an extension must declare that it implements extension API version 2 using the 'implements_api_version' entry in the info block of properties.json: