Adding Drill-Down Links to Content
Drilldowns are a powerful feature that allows users to navigate from one content item to another, providing access to additional, related information at run-time. Drill-down links can also be used to pass parameters, so that the target content is automatically filtered for the value that a user selects, allowing you to maintain context between items. By linking content with drilldowns, you can vastly expand the amount of information that is available from a single chart or report.
In a report, drill-down links are provided as hyperlinked values. In a chart, drill-down links are executed when you click a section of the chart. When you add multiple drill-down links to a single field, you can select one from the tooltip menu that results when you click a report hyperlink or point to an area of a chart.
You can create different types of drill-down links to connect to different types of target items. You can use the link to open a selected content item or page, connect to a URL, or execute a JavaScript function.
To create drill-down links for a field, right-click a field in any bucket of a report, or in the default measure bucket of certain chart types, and click Configure drill downs. The Configure Drill Downs dialog box opens, as shown in the following image.
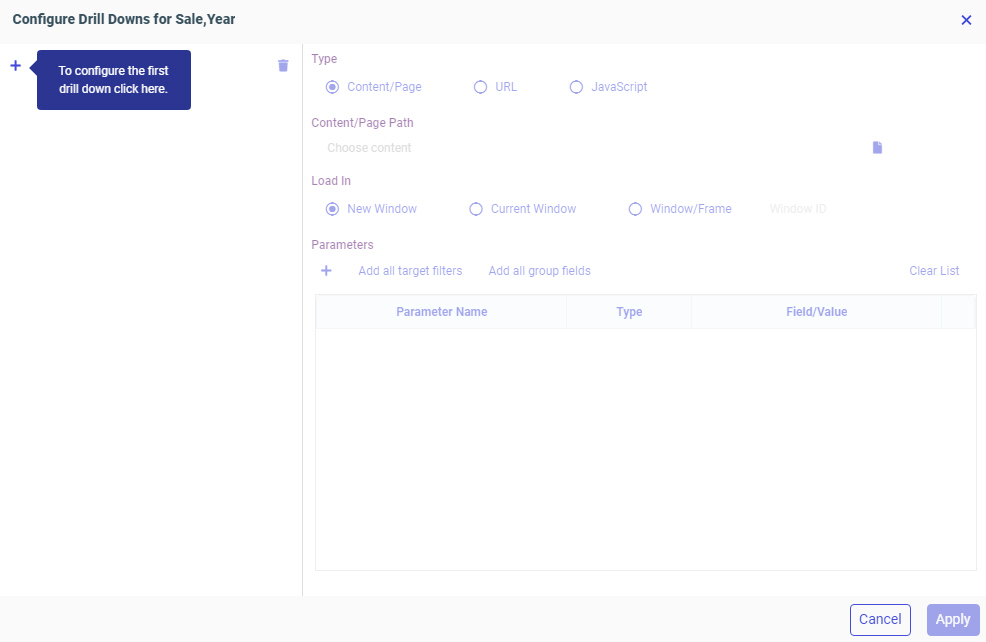
To create a drilldown, click the plus icon. Next, determine the type of content that you want to link to. The information that you provide to create the drilldown differs depending on the target type.
Select Content/Page to link to another procedure, such as a chart or report, or to a page. Select the item from your WebFOCUS repository, and choose where it should load. You can load the target content in a new window or browser tab, the same window as the current item, or you can specify a window or frame by name.
Note: Drill-down links are functional at design time. When the drill-down target location is Current Window, clicking a drill-down link in the canvas opens the target in a new browser tab or window so that WebFOCUS Designer can stay open. When you run your content, drilldowns with a target location of Current Window load in the window where the drilldown was accessed.
You can also configure the drilldown to pass parameter values to the target item. If the target uses dynamic parameters, such as prompted filters, matching parameters with the same name are automatically created to pass the value that a user clicks. The selected value will be applied to the target content when it loads.
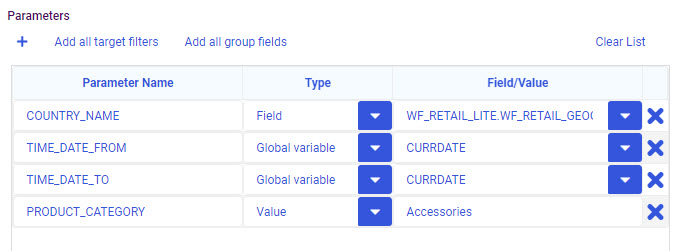
To manually add parameters to pass through the drilldown, click the plus sign in the Parameters section of the Configure Drill Downs dialog box. Provide a parameter name, set whether the parameter should pass field values, or a static value that you set, and then select the field or enter a value to pass. You can automatically create all parameters in the target content by clicking Add all target filters, or create parameters for all sort fields in your parent content – that is, the chart or report that you are currently editing – by clicking Add all group fields. You can then delete individual parameters if you want, or delete all parameters by clicking Clear List.
To manually add parameters to pass through the drilldown, click the plus sign in the Parameters section of the Configure Drill Downs dialog box. First, provide a parameter name, which should match the names of amper variables in the target content. Using the menu in the Type column, set whether the parameter should pass field values, a static value that you set, or the value set for a global variable in your environment. Finally, select a field, enter a value, or select a global variable to pass. You can automatically create all parameters in the target content by clicking Add all target filters, or create parameters for all sort fields in your parent content – that is, the chart or report that you are currently editing – by clicking Add all group fields. You can then delete individual parameters if you want, or delete all parameters by clicking Clear List. Drill-down parameter options are shown in the following image.
To link to a web page through a URL, select the URL radio button. The URL must include the protocol, for example, http or https, if it is an external link. Otherwise, the URL will be interpreted as a partial URL within your WebFOCUS environment.
Next choose where the target URL should load, whether in a new window, the same window, or elsewhere. Finally, add any parameters. If you add parameters, they are appended sequentially to the end of the URL as key-value pairs using a GET request in the following format:
?parameter_name1=value1[¶meter_name2=value2 ... ¶meter_namen=valuen]
where:
- parameter_name1, parameter_name2, parameter_namen
-
Are parameter name values, specified in the Parameter Name column of the Configure Drill Downs dialog box.
- value1, value2, valuen
-
Are parameter values. They can be field values passed from the report, or static values. The field or static value is specified in the Field/Parameter/Value column of the Configure Drill Downs dialog box.
The question mark (?), ampersands (&), and equals signs (=) are added to the URL automatically, so you do not need to include them when setting up the drilldown.
To execute a JavaScript function from the drill-down link, select the JavaScript radio button. In the JavaScript Function text box, supply the name of the JavaScript function. The function and the arguments that it accepts must already be defined for the function to work. You can define custom JavaScript functions in a .js file on your environment, which you can create using the text editor or upload from your machine, then reference that file using the SET JSURLS command. This command can be applied globally by adding it to edasprof.prf on the WebFOCUS Server, so the functions in the file are always available to whoever has access. Alternatively, you can add the SET JSURLS command to the Preprocessing Other component of a Reporting Object, then use it as the data source for your content.
In the Request Parameters area, add each argument, in order, as a separate row. These arguments can be static values, by setting the Type column to Value, or dynamic field values, by setting the Type column to Field. Once the type is set, enter the value or select the field whose value should be used as the argument.
You can manage your drilldowns from the pane at the left side of the Configure Drill Downs dialog box. You can create multiple drilldowns that you can access from the same hyperlink in a report or the same area of a chart. To create more drill-down links that you can select from the same location, click the plus sign above the list of drilldowns in the Configure Drill Downs dialog box, as shown in the following image.
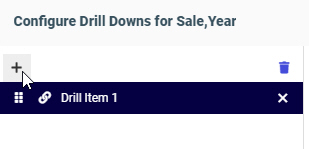
When you click a link in a report or an area of a chart that includes multiple drilldowns, a menu appears, listing them all.
Note: The menu for multiple drilldown links on a single field does not display if a report is created as part of a page. They display properly for charts, stand-alone reports, and reports added to a page as external content.
To rename a drilldown link, double-click the title in the drilldown list, and type a new title. These titles appear in the tooltip in your content when selecting a drilldown to execute. Drag a drilldown using the handles to the left of the drill-down title to change the order in which your drilldowns appear.
If you want to remove a drilldown, click the X next to its name. To remove all drilldowns, click Remove All Drill Items  .
.
Procedure: How to Pass Parameter Values to a Page
You can drill down from a chart or report to a page created in WebFOCUS Designer. Drill-down parameters can be passed to the page to apply their values to any page filters.
- Create and save a page that includes prompted filters. These filters can be created by adding parameterized external content to an assembled page and clicking Add all filters to page on the Filters tab of the sidebar, or can be created in a page with new content by dragging a field to the Filter toolbar.
The filters in this page will be populated with values passed from a drill-down report.
For information on creating a page, see Creating Pages.
- Create a new report.
On the WebFOCUS start page or the WebFOCUS Home Page, click Visualize Data.
WebFOCUS Designer opens.
- Select the same data source that was used to filter the page, and click Select.
The WebFOCUS Designer canvas appears.
- Create a chart or report that is sorted by the same fields that are used as filters in the page. For example, if the page is filtered by Customer Business Region and Sale Year, create a report with those fields in the row bucket. Add other measures and dimensions to your content based on your needs and preferences.
- Determine the measure field in a chart, or any field in a report, to which to add drill-down links.
If you are passing multiple parameter values through the drilldown, selecting a field in the chart or report with additional sort values under it may help clarify to the user which values will be passed.
For example, in the report shown in the following image, the Sale Year field is the secondary sort field while Customer Business Region is the primary sort field, so each row in the Sale Year column represents a sale year and a business region.
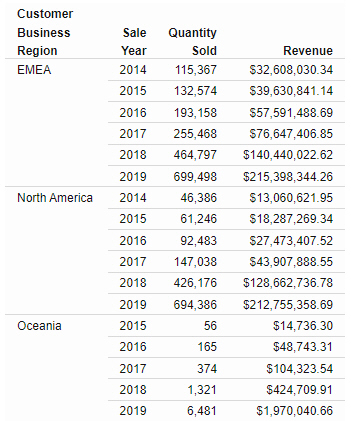
In this case, adding the drill-down links to the Sale Year column would allow you to choose from all of the available Customer Business Region and Sale Year values, whereas adding the links to the Customer Business Region column would only allow you to pass parameter values for the first sale year in each business region group. As an alternative to creating drilldowns on the lower level sort field, you could ensure that all parameter values are passed from a report by using repeating sort values. On the Content picker, select the Grid report layout option.
- Right-click the field to which you want to add drill-down links and click Configure drill downs.
The Configure Drill Downs dialog box opens.
- Create a new drilldown by clicking the plus sign, Create New Drill Item, icon in the pane on the left.
The Content/Page drilldown type, which we are using to drill to a page, is selected by default.
- In the Content/Page Path text box, click the file icon to select the page that you want to drill to.
Notice that the Parameters grid is automatically filled based on the filters in the selected page.
- In the Load In area, select the location where the target page should run. It can be the same window where the report was run, in a new browser tab, or a user-specified location.
- In the Parameters section, check whether the parameters that you want to pass have already been added. To add a new parameter, click the plus icon, and proceed with the following steps.
- In the Parameter Name column, type the name of the parameter. Typically, this matches the field name. You can check the parameter names used in an assembled page by clicking the Info button.
- From the Type menu, choose whether the value to pass should be a field value, associated with the link that a user selects, the value of a global variable defined in your environment, or a constant value.
- If you selected Field, use the Value menu to select a field from your content. If you selected Constant, type a constant value to pass to the page.
- Repeat step 11 for all parameters whose values you want to pass to the target page, or click the X in the right-most column of the Parameters grid to remove unneeded parameters.
- Double-click the default drill-down name, for example, Drill Item 1, to change the name of the drilldown. This name appears in the tooltip when you point to a drill-down link, or click a link that includes multiple drilldowns.
- Click Apply to create the drilldowns.
In a report, drill-down links are added for each value of the field where the drilldown was created. In a chart, drilldowns are added to each section.
- Run the chart or report.
- At run-time, drill down to the target page.
- If you created a chart, click a section of the chart. If there are multiple drilldowns, select the drilldown that you just created.
- If you created a report, click a drill-down link. If that field of the report has multiple drilldowns associated with it, select the drilldown that you just created.
- The page opens in a new browser tab or window. Notice that the value or values represented by your selection in the parent content item are applied as filter values in the page.
Procedure: How to Pass a Global Variable Value Through a Drilldown
A global variable is a variable that maintains its value for the duration of a WebFOCUS session or until a different value is assigned. Global variables are identified by double ampersands. As opposed to local amper variables, which you can pass different values through a drilldown to filter target content based on the value that you select, the best use for global variables is to maintain a single consistent value as you run different content items. In this example, we will set a global variable to the current date, allowing us to filter target content for that date value by invoking the global variable.
The advantage of using a global variable is that its value is not contingent on the content item that is passing it. A local variable, when passed through a drilldown, must be set in the parent procedure, so a field must be added that contains values that the local variables can pass. This is not the case for a global variable, which is set externally to the procedure. However, since the global variable is not set by the procedure that passes it, the drill-down value that you select will not affect the value that is passed, unless the global variable is set to be dependent on a local variable.
The drill-down parameter options in WebFOCUS Designer provide a list of global variables that are already defined in your environment, so the first step is to set the global variable value. Next, you can create target content filtered by a field that can accept that value, and finally you can create the drill-down content that will pass the global variable to the target.
- On the WebFOCUS start page or the WebFOCUS Home Page, click Workspaces to open the Workspaces area.
- On the Action bar, click Other, and then click Text Editor.
The New Text Resource dialog box opens.
- Click FOCEXEC (fex) to create a new WebFOCUS procedure using the text editor.
This procedure will set a value for a new global variable.
The text editor opens.
- In the text editor, type the following:
-SET &&CURRDATE = &YYMD;
-TYPE &&CURRDATE
The first line sets the value of a new global variable, &&CURRDATE, to today's date, represented by &YYMD. &YYMD is a system variable that always returns the current date in a YYMD (year-month-day) format. You can change CURRDATE to whatever you want, since it is just the name of the global variable that you are creating.
The second line displays the value of the global variable, &&CURRDATE in this example, as text in the output using the -TYPE command, so you can make sure that it has been set properly.
Click Preview
 on the text editor toolbar. A new window opens with a message showing the result of the executed procedure. There is no actual output, but it should show the current date in YYMD format under the Detail area.
The global variable is now set for the duration of the WebFOCUS session. To ensure that the variable is always set when a user signs in, an administrator can set this procedure to run automatically using a setting in the WebFOCUS Administration Console. To configure this setting, complete the following steps:
- Save the procedure that sets the global variable and return to the WebFOCUS start page or Home Page.
- In the Workspaces area, navigate to the location where you saved the procedure. Right-click it and click Properties.
- Copy the value of the Path property, which is the IBFS path of the procedure that sets the global variable value in your environment.
- On the WebFOCUS start page, click the Management Center and then click Administration Console. Alternatively, on the WebFOCUS Home Page banner, open the Settings menu and then click Administration Console.
The WebFOCUS Administration Console opens.
- In the navigation pane on the Configuration page of the Administration Console, click Other.
- Paste the path of the procedure that sets the global variable value into the Paths to be executed on user Sign-in field.
- Click Save.
When a message appears indicating that the new setting has been saved successfully, click OK and close the Administration Console.
- Create a content item that will be the target of a drilldown that passes the global variable. We will create this item first since we need to be able to select a target item when we create the drilldown.
In this case, since the global variable that we have created is set to a date value, we will want to create target content that is filtered by a date field.
Create a new chart or report.
WebFOCUS Designer opens, and you are prompted to select a data source.
- Navigate to and select a data source that includes a date field with data for the current date, and then click Select.
The Designer canvas displays.
- From the field list, drag a date field to the Filter toolbar to create a dynamic parameter filter. You do not need to select values for this filter control, since they will be supplied by the global variable.
The date control in Designer provides a date range, so when we pass the global variable to the filter parameter, we will pass it as both the start and end date to filter our content to show data for just the current date.
- Add fields to your content, and, optionally, change the content type and add more parameter filters. You can also add more content items to create a page by clicking Add visualization. All items on this page are affected by the filter controls on the Filter toolbar. You can use drilldowns to pass local parameter values to these filters alongside the global variable value that we will pass.
When you are finished creating the target content, click Save.
- Create a new chart or report that will include drill-down links that pass the global variable that we configured to our target item.
On the WebFOCUS start page, click the plus menu and then click Create Visualizations, or, on the WebFOCUS Home Page, click Visualize Data.
WebFOCUS Designer opens, and you are prompted to select a data source. If you added any filters in addition to the one that will receive the global variable value, you should use the same data source as your target item.
- Change the content type and add fields to create a content item to which you will add your drilldowns. If you added any filters to the target item in addition to the one that will receive the global variable, you should make sure that the fields used for those filters are added to this content item.
- Right-click a dimension field in a report or a measure field in chart and click Configure drill downs.
The Configure Drill Downs dialog box opens.
- Create a new drilldown by clicking the plus sign, Create New Drill Item, icon in the pane on the left.
The Content/Page drilldown type, which we are using to drill to the target content item, is selected by default.
- In the Content/Page Path text box, click the file icon to select the item that you want to drill to.
Notice that the Parameters grid is automatically filled based on the filters in the selected page.
- In the Load In area, select the location where the target page should run. It can be the same window where the report was run, in a new browser tab, or a user-specified location.
- In the Parameters section, check whether the parameters that you want to pass have already been added. Parameters for start and end dates for a date range filter should appear automatically since the filter was created in the target item.
For both of these parameters, complete the following steps:
- From the Type menu, select Global variable.
A drop-down menu appears in the Field/Value column.
- In the Field-Value column, select the global variable that you defined earlier.
- From the Type menu, select Global variable.
- Repeat these steps for the second date parameter. Filters for date fields create ranges with a start and end date. by default. By setting these to the same date limits the date range to a single day.
- Set values for any other parameters in the target report by specifying the field whose value should be passed based on the value that you select to execute the drilldown, or a static value that you always want to pass.
- Click Apply to create the drilldowns.
- On the Visualization toolbar, click Run in new window to run your content and test the drilldowns.
- Execute a drilldown. It should run the target content, which should be filtered for the current date as specified by the global variable that was passed.
- If everything works as expected, return to WebFOCUS Designer and save your content.
Procedure: How to Drill to a Webpage From a Selected Value
When you pass parameters using a URL drilldown, they are sent using GET requests. You can use this functionality to access different web pages based on the value that you select from your content.
In this example, we will use a URL drilldown to open a Wikipedia article for the country that we select.
- In WebFOCUS Designer, create a chart or report using a field with country names as a sort field.
- In a chart, right-click a measure field or, in a report, right-click the field to which you want to add drill-down links, and then click Configure drill downs.
The Configure Drill Downs dialog box opens.
- Create a new drilldown by clicking the plus sign, Create New Drill Item, icon in the pane on the left.
- Change the Type of the drilldown to URL.
- In the URL text box, type the root URL to which the GET request will be added. For this example, type https://en.wikipedia.org/w/index.php.
A question mark, followed by the parameter name and value, will be appended to this URL.
- Optionally, change the target location of the URL from Self, which opens the target URL in the same window or tab as the drill-down chart or report, to New Window, which opens the target URL in a new tab or window, or Window/Frame, which opens the URL in a user specified container.
- Add a new parameter to the drilldown.
- Click the plus sign icon under Parameters to add a new parameter.
- In the Parameter Name column, type the name of the parameter. The URL that we are using in this example accepts a parameter called title, which is the name of the Wikipedia article to open.
- Leave the Type column set to Field. We want to pass dynamic field values through the URL drilldown so that the value that we click is reflected in the article that opens on click.
- Select the field whose value you want to pass. For this example, select the country field that you added to your chart or report.
- Optionally, in the pane on the left, double-click the default drill-down name, for example, Drill Item 1, and type a new name for your drilldown. This name appears in the tooltip when you point to a drilldown link in a report, or when there are multiple drilldowns on a single field.
- Click Apply to create the drilldown.
- Click Run in new window to view your content at run time.
- Click a hyperlink in a report or a section of a chart. The Wikipedia article opens for the value that you clicked.
Procedure: How to Execute a JavaScript Function From a Drilldown
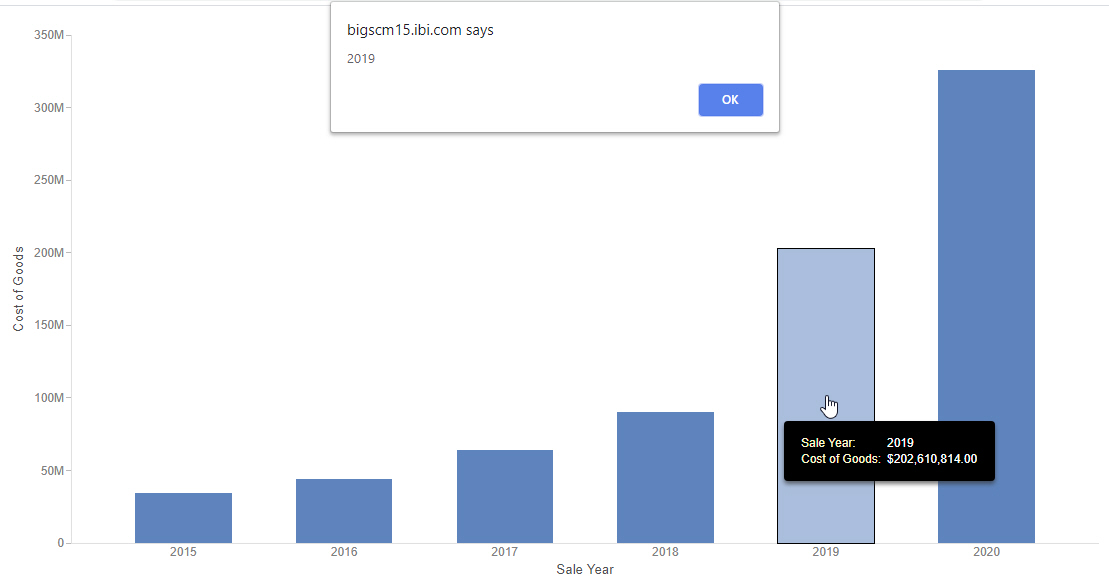
You can trigger a JavaScript function when using a drilldown in your content. The parameters defined when setting up the drilldown are used as the arguments in the JavaScript function. This simple example uses the alert function, which requires no special setup or configuration, to display the dimension field value that a user clicks.
- In WebFOCUS Designer, create a new chart or report and add at least one measure field and one dimension field.
- In a chart, right-click a field in the default measure bucket, or in a report, right-click the field to which you want to add drill-down links, and click Configure drill downs.
The Configure Drill Downs dialog box opens.
- Create a new drilldown by clicking the plus sign, Create New Drill Item, icon in the pane on the left.
- Change the Type of the drilldown to JavaScript.
- In the JavaScript Function text box, type alert, which is the name of the function used in this example. It opens a pop-up window displaying the value of the first argument as text.
- Add a new parameter to the drilldown.
- Click the plus sign icon under Parameters to add a new parameter.
- To display a field value in the alert message, leave the Type column set to Field. Change the Type to Value to always display the same value in the alert.
- Select the field whose value you want to pass. It can be a measure field or a dimension field.
- Optionally, in the pane on the left, double-click the default drill-down name, for example, Drill Item 1, and type a new name for your drilldown. This name appears in the tooltip when you point to a drilldown link in a report, or when there are multiple drilldowns on a single field.
- Click Apply to create the drilldown.
- Click Run in new window to run your chart or report.
Your content runs in a new browser tab or window.
- Click a hyperlink in a report or a section of a chart. An alert appears, displaying the value that you selected, as shown in the following image.
Procedure: How to Execute a Custom JavaScript Function From a Drilldown
With some additional configuration, you can execute a custom JavaScript function from a drilldown link. This provides significant flexibility in defining what occurs when a drill-down link is clicked. In this example, we have created a JavaScript function that opens a mailto URL, dynamically populated with an email address and first name from our data source. The first name will be added to the subject line of the email. Since the email address in a mailto URL is not supplied as a key-value pair, we cannot do this using a URL drilldown.
- First, define the custom JavaScript function using the text editor.
- On the WebFOCUS start page or the WebFOCUS Home Page, click Workspaces.
- On the Action Bar, click the Other tab, then click Text Editor.
The New Text Resource dialog box opens.
- On the Web tab, click JavaScript (js).
The text editor opens.
- Enter the code for your JavaScript function.
In this example, the function to generate a mailto URL is called fnMail, and is coded as follows:
function fnMail(Email,Name)
{
window.location = 'mailto:' + Email + '?Subject=Hello, ' + Name;
    }
The two parameters that we will need to supply from the drilldown will be the email address, for the Email argument, and the first name, for the Name argument.
- Save the new JavaScript file to your WebFOCUS Repository.
- Create a new report using WebFOCUS Designer.
- In WebFOCUS Designer, select a data source that includes email address and first name fields.
In this example, we are using the wf_retail_lite.mas Master File, part of a sample dataset that can be added to your TIBCO WebFOCUS environment.
- On the Content picker, change the content type to a report layout, either the Standard Report or Grid options.
- Optionally, add filters to reduce the size of the report and the processing time that it requires.
- Add the email address and first name fields to your report.
If you are using the wf_retail_lite Master File as your data source, in the Dimensions area, expand Customer and then Full,Name, then double-click Email,Address and First,Name.
- Add one or more measure fields to the report.
- Right-click a field, for example, the email address field, in one of the buckets, and click Configure drill downs.
The Configure Drill Downs dialog box opens.
- Create a new drilldown by clicking the plus sign, Create New Drill Item, icon in the pane on the left.
- Change the Type of the drilldown to JavaScript.
- In the JavaScript Function text box, type fnMail, which is the name that we gave to the function used in this example.
- Add the first parameter, which supplies an email address, to the drilldown.
- Click the plus sign icon under Parameters to add a new parameter.
- Leave the Type column set to Field. The recipient of the email from the mailto URL should change depending on the value that we click in the report.
- Select the field whose value you want to pass. In this case, it is the email address field.
- Add the second parameter, which supplies an associated first name, to the drilldown.
- Click the plus sign icon under Parameters to add a new parameter.
- Leave the Type column set to Field. The first name shown in the subject of the email from the mailto URL should change depending on the value that we click in the report.
- Select the field whose value you want to pass. In this case, it is the first name field.
- Optionally, in the pane on the left, double-click the default drill-down name, for example, Drill Item 1, and type a new name for your drilldown. This name appears in the tooltip when you point to a drilldown link in a report, or when there are multiple drilldowns on a single field.
- Click Apply to create the drilldown.
- Save the report and exit WebFOCUS Designer.
- Finally, we must tell our report request where the custom JavaScript function is defined. We can use the SET JSURLS command to specify the location of the .js file that we created earlier. This command can be added to the edasprof server profile so that it is available to all procedures. This step must be performed by someone with administrative privileges on the WebFOCUS Server.
Note: As an alternative, you can add the SET JSURLS command to the Preprocessing Other component of a Reporting Object, then use it as the data source for your content.
On the WebFOCUS start page, click Management Center and then click Server Workspaces.
Or, on the WebFOCUS Home Page, open the plus menu and click Prepare and Manage Data.
In the WebFOCUS Reporting Server browser interface, open the Tools menu
 and click Workspace.
The Server Workspace view opens.
- On the resource tree, expand Configuration Files, then right-click Server Profile - edasprof.prf and click Edit.
- On a new line, type SET JSURLS=
- After the equals sign (=), in quotes, add the run-time URL for the .js file in which the function is defined, then close with a semicolon (;).
The run-time URL uses the following format:
http[s]://hostname:port/context_root/run/path_to_item
where:
- hostname
-
Is the name of the system where WebFOCUS is installed.
- port
-
Is the port number used by WebFOCUS.
- context_root
-
Is the context root used for your WebFOCUS application. For example, ibi_apps.
- path_to_item
-
Is the IBFS path of the JavaScript file in your WebFOCUS repository. You can find the path of a page by right-clicking it on the WebFOCUS Home Page and clicking Properties. The file path is listed as the Path property.
Slashes (/) between folder names should be retained literally instead of encoded in the URL, and the colon (:) should be removed after IBFS. For example:
http://localhost:8080/ibi_apps/run/IBFS/WFC/Repository/My_Workspace/~user/custom.js
The full SET JSURL command may resemble the following:
SET JSURLS='http://localhost:8080/ibi_apps/run/IBFS/WFC/Repository/My_Workspace/~user/custom.js';
- Save your changes to edasprof.prf
- Return to the start page or Home Page and run your report, then click a drill-down link.
A new email opens with the To address and Subject line already filled, with different values depending on the link that you click.
Procedure: How to Use a JavaScript Drilldown to Run a Chart or Report in a Target Panel on a Page
You can use a specific, pre-configured JavaScript function called portalDispatch to drill to a target chart or report, and run it an a specified target container on a page. This target container can be identified by a CSS class, which you can set using the Classes property for the content area within a container. The target container can be a basic panel container with a single content item, or a multi-content container, such as a tab, accordion, or carousel container, that contains multiple items. If the content area that contains the target item is part of a multi-content container, then it becomes visible immediately when the drilldown is executed. For more information on setting and using CSS classes, see Styling Pages With Custom CSS. The target chart or report, which you evoke to run in the target container, is referenced using the IBFS path, which you can find in the Path field when viewing the properties of an item on the start page or Home Page. You can pass multiple items to multiple containers listed in sequence, and you can also pass the values of multiple fields from a single drill-down link to multiple parameters in the target item or items.
First, create one or more target charts or reports that you want to run when a drill-down link is clicked. You can add dynamic parameter filters to these items so that they are filtered based on the selected drill-down link. Next, create a chart or report with a drilldown that executes a JavaScript function called portalDispatch. The function arguments determine what items are run, and where they should run. Finally, assemble a page that contains the drill-down content and containers in which the target content can run. You must also ensure that the portalDispatch JavaScript function is recognized, by specifying the location of the .js file that contains it on the WebFOCUS Server.
- First, create one or more target charts or reports using WebFOCUS Designer.
In order to receive parameter values from your drilldown, the target content must have single select filters. Filters created in InfoAssist are single select by default, while those created in WebFOCUS Designer are multi-select by default, meaning that you must set them to accept a single filter value for them to accept passed parameter values.
- On the WebFOCUS start page, click the plus menu and click Create Visualizations or, on the WebFOCUS Home Page, click Visualize Data.
WebFOCUS Designer opens, where you are prompted to select a data source.
- Select the data source that you want to use. You should use the same data source for the target content and the parent content containing the drill-down links.
- Create your target content by adding fields to the appropriate field containers, and applying your preferred customizations and styling options.
- Add prompted filters to your content, allowing it to be filtered based on the selected drill-down link. The field or fields used to filter the target content should be used as sort fields in the parent content that contains the drilldowns.
Drag a field from the Data pane to the Filter toolbar. Optionally, select default values for your filters.
Repeat these steps to allow the target content to accept multiple parameters from a drill-down link.
- Make all of the prompted filters in your target content single select. Right-click each alphanumeric filter prompt and click Single.
- Save the target chart or report.
- Repeat steps 1a through 1f to create multiple target charts and reports. The portalDispatch function can invoke and pass parameters to multiple charts and reports at once.
- On the WebFOCUS start page, click the plus menu and click Create Visualizations or, on the WebFOCUS Home Page, click Visualize Data.
- Create the chart or report that will contain the drill-down links that run the target item or items created in step 1.
- On the WebFOCUS start page, open the plus menu and click Create Visualizations, or, on the WebFOCUS Home Page, click Visualize Data.
WebFOCUS Designer opens, prompting you to select a data source.
- Select the data source that you want to use. This should be the same data source that you used for the target content in step 1.
- Create the drill-down parent content, which can be either a chart or report, by adding measure and dimension fields to the appropriate buckets.
The dimension fields that are used as dynamic parameter filters in the target content should be used as sort fields in the parent content.
- Add drill-down links to your content. If you are creating a report, right-click a sort field, and if you are creating a chart, right-click a measure field. From the shortcut menu, click Configure drill downs.
The Configure Drill Downs dialog box opens.
- Create a new drilldown by clicking the plus sign, Create New Drill Item, icon in the pane on the left.
- Select the JavaScript radio button to create a drill-down link that executes a JavaScript function.
- In the JavaScript Function text box, type portalDispatch. This is a pre-existing function that has already been defined in a file in the default WebFOCUS installation.
- In the Request Parameters, click the plus button (+) to provide values of arguments in the JavaScript function. Each one occupies its own line in the parameter table. You will add at least 6 parameters, with extra parameter-field pairs if you want to pass multiple parameter values to the filters you set up in the target content.
Specify the following parameter values in the JavaScript drilldown:
- Add a new parameter and change the Type to Value using the drop-down menu in the Type column. In the Field/Value column, type drillRefresh.
- Click the plus button again to add another new parameter. Change the Type to Value and type self in the Field/Value column.
-
Add another new parameter. Change the Type to Value, and type the name of a CSS class that will identify the content area of the panel in which the drill-down target content will run.
For example, if you type panel1 in the Field/Value column when configuring the drill-down parameters, you will need to add panel1 to the Classes property of the content area of the container in the page where the drill-down content will run.
You can run multiple content items to multiple containers from the same drill-down link, in which case the class names should be separated by spaces. For example, panel1 panel2.
-
Add another new parameter. Change the Type to Value, and type or paste the IBFS path of the target content that you created in step 1.
To find the IBFS path of an item, right-click it on the start page or Home Page and click Properties. The IBFS path of the item is listed in the Path field. You can copy it to paste into the Field/Value column when configuring the parameter for the target content.
If you want to run multiple content items, separate them with spaces. The order of the paths should be coordinated with the order of the container classes specified in step 2h3. The first listed target item runs in the container with the first specified class, the second listed item runs in the container with the second specified class, and so on.
-
Add another new parameter. Change the Type to Value, and, in the Field/Value column, type the name of the parameter used to filter the target content. By default, this is the name of the field.
- Add another new parameter. Leave the Type as Field, and, in the Field/Value column, select the field associated with the parameter name provided in step 2h5.
- If the target content has multiple dynamic parameter filters, repeat steps 2h5 and 2h6 to supply the other parameters as name-field pairs.
-
Once you have added all parameters to the drilldown, your drill-down configuration may resemble the one shown in the following image.

Click Apply to generate the drill-down links in your chart or report.
Your content now executes the portalDispatch JavaScript function when you click a value that includes drilldowns.
- Save your content and return to the start page or Home Page.
- On the WebFOCUS start page, open the plus menu and click Create Visualizations, or, on the WebFOCUS Home Page, click Visualize Data.
- Create a page to which you will add the content containing the drill-down links that you just created, and enough additional panels to run the content items that you set to run when a drilldown is executed, based on step 2h4.
On the start page or Home Page, click the plus button and then click Assemble Visualizations.
WebFOCUS Designer opens, allowing you to create a page from existing content.
- You are first prompted to select a page template. You can select one of the preset options, or select Blank to add your own containers to the page.
The Designer canvas opens.
- Assemble the page where you will be able to load the target content created in step 1 after clicking a drill-down link in the item created in step 2.
- With the Content tab selected on the sidebar, navigate to the item that you created in step 2, and drag it into a container or an empty area of the page.
The item with the drilldowns displays on the page. Resize it as needed.
- Add a container for each drill-down target item created in step 1. The container can be empty, or contain an item that will be replaced with the drill-down target item. If you selected a page template, there may be containers available already. Note that you can have these items run in separate tabs, accordion panels, or slides of multi-content container.
- Select the content area of a target container by clicking inside it. On the Settings tab, in the Classes text box, type the name of the first class that you defined in step 2h3.
If the content area that you select is part of a tab, accordion, or carousel container, then when you execute the drilldown, the container immediately updates to display the target item.
Repeat this step for any additional contains in which you want to run other content items, specified in step 2h4, using the class names defined in step 2h3.
- With the Content tab selected on the sidebar, navigate to the item that you created in step 2, and drag it into a container or an empty area of the page.
- Now that the content has been added and the containers have their classes set, save the page.
- Finally, we must tell our report request where the custom JavaScript function is defined. We can use the SET JSURLS command to specify the location of the .js file in the WebFOCUS installation that includes the portalDispatch funciton. The SET JSURLS command can be added to the edasprof server profile so that it is available to all procedures. This step must be performed by someone with administrative privileges on the WebFOCUS Server.
Note: As an alternative, you can add the SET JSURLS command to the Preprocessing Other component of a Reporting Object, then use it as the data source for your content.
- On the WebFOCUS start page, click Management Center and then click Server Workspaces.
Or, on the WebFOCUS Home Page, open the plus menu and click Prepare and Manage Data.
In the WebFOCUS Reporting Server browser interface, open the Tools menu
and click Workspace.The Server Workspace view opens.
- On the resource tree, expand Configuration Files, then right-click Server Profile - edasprof.prf and click Edit.
- On a new line, type SET JSURLS = '/ibi_apps/tools/portalcanvas/iframeinterface.js'
The partial URL points to the location in your WebFOCUS installation where the portalDispatch JavaScript function is defined. Note that if the context root of your installation is not ibi_apps, you must replace this part of the path with the custom context root that you are using.
- Save your changes to edasprof.prf
- On the WebFOCUS start page, click Management Center and then click Server Workspaces.
- Now that the JavaScript function is enabled, return to the start page or Home Page, and run the Designer page. Right-click the page, and click Run in new window.
The page runs in a new browser tab. Click a drill-down link in the parent item created in step 2. One or more target items, created in step 1, run in another container on the page. These items are also filtered based on the value that you clicked, since you specified the parameter name and field when setting up the JavaScript function.
- Optionally, click more drill-down links to update the filter values applied to the target content, or click the Refresh button on the page toolbar or container menu to reset the contents of the page.
- Release: 8207
- Category: Visualizing Data
- Product: WebFOCUS Designer
- Tags: How-to's, Release Features